Java programmers are probably familiar with Spring Boot. It is a well-liked Java framework that facilitates the development and execution of Spring-based applications.
However, setting up a Spring Boot project can be tedious, particularly if you're not familiar with the dependencies and parameters of the framework. Spring Boot Initializr can help with that.
In this tutorial, I will show you how to create a spring boot project from Spring Initializr website with little configuration.
Table Content
1. What is Spring Boot Initializr?
2. Benefits of using Spring Boot Initializr
3. How to create a Spring Boot Application using Spring Initializr?
4. Import Spring Boot Initializr Project In Spring Tool Suite and IntelliJ IDEA Tool
5. Features of Spring Boot Initializr
6. Best Practices for Using Spring Boot Initializr
7. Common Use Cases for Spring Boot Initializr
8. FAQs
1. What is Spring Boot Initializr?
With pre-configured dependencies and parameters, Spring Boot Initializr is a web-based starting project generator that enables developers to easily establish new Spring Boot projects.
Developers can select the required project dependencies, package format, Java version, and other project settings using the tool's straightforward and user-friendly web interface.
2. Benefits of using Spring Boot Initializr
1. Quick and Easy Setup
You can quickly and easily create a new Spring Boot project with the help of Spring Boot Initializr. You can simply choose your preferred parameters and download the project file instead of starting from scratch.
2. Customizable Project Configuration
Numerous choices are available in Spring Boot Initializr to customize the project's settings.
The language, dependencies, packaging, and other project meta settings are all yours to choose from. As a result, you can design a project template that is customized for your particular requirements.
3. Dependency Management
Utilizing Spring Boot Initializr has many advantages, but dependency management is one of them. Your project's dependencies, including changeable dependencies, are managed by this tool.
This makes it simpler to manage the dependencies for your project and ensures that you're utilizing the most recent and reliable versions of your dependencies.
4. Generation of Starter Code
With the help of Spring Boot Initializr, a starter code is generated for your project, giving you a base upon which to build. The beginning code can be altered to add or remove features as desired.
5. Multiple Packaging Options
JAR and WAR are of the packaging offered by Spring Boot Initializr. This enables you to organize your project according to your own requirements.
3. How to Create a Spring Boot Application using Spring Initializr
It's simple to use Spring Boot Initializr. Take these steps:
Step 1: Access the Initializr Web Interface
Go to https://start.spring.io/ to access the Spring Boot Initializr web interface.
Step 2: Configure the Project
Choose the desired project configuration choices, such as the programming language, Spring Boot version, project packaging, and dependencies, on the Spring Boot Initializr online interface.
To generate the project after configuring it as desired, click the Generate button.
Step 3: Download and Extract the Project
Download the ZIP file containing the project after it has been generated, then unzip it to a directory of your preference.
Step 4: Import the Project into Your IDE
By choosing the option to import a project, import the project into your IDE.
4. Import Spring Boot Initializr Project In Spring Tool Suite and IntelliJ IDEA Tool
Here, we'll demonstrate how to import the Spring Boot Initializr project into the IntelliJ IDEA Tool and Spring Tool Suite.
Import In Spring Tool Suite:
I have assumed you have installed Spring Tool Suite in your system.
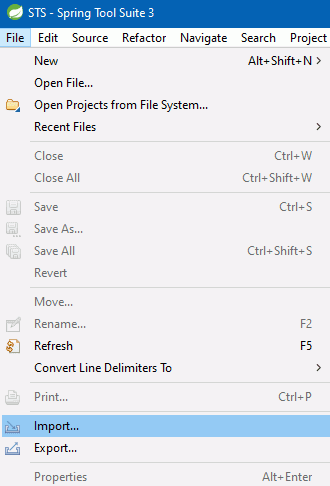
Step 1 – I have used the Spring Tool Suite editor to start. As indicated in the diagram, go to File and choose the Import option
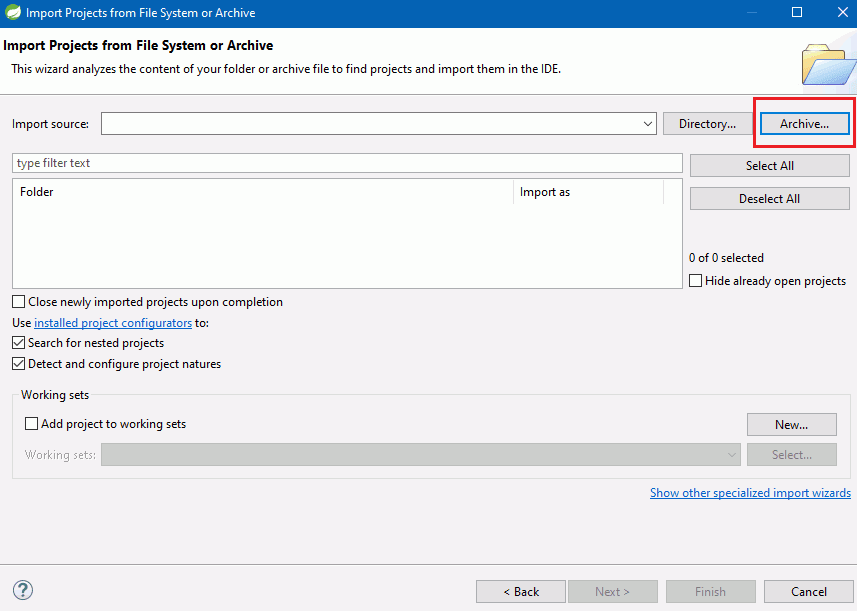
Step 2 – If you choose Projects from a folder or archive, the Open custom window will appear.
Step 3 – To open the custom window once more, click the Archive button in the right sidebar.
Step 4 – Choose the "Your Project" project zip file from the directory of the download folder.
Here, I choose the zip file containing my SpringBootCrudMvc project.
Step 5 – View the imported zip file for the project. It is not necessary to have the SpringBootCRUDMongoDB.zip expanded checkbox selected. Decide to click Finish.
Import In IntelliJ IDEA Tool:
I have assumed you have installed IntelliJ IDEA Tool in your system
Step 1 – Set your unique disk path and copy the zip project file from the folder directory to the download folder.
Step 2 – Zip file project files should be extracted.
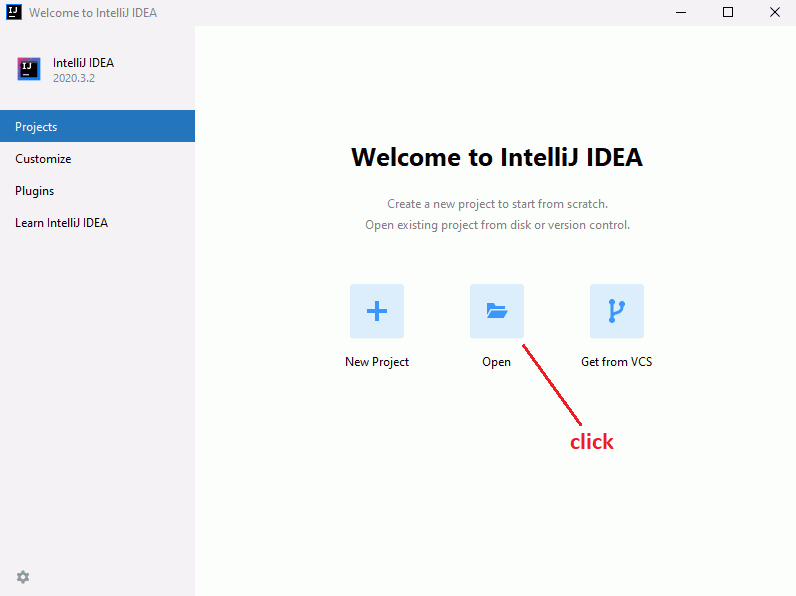
Step 3 – Launch the IntelliJ IDEA tool. To view the three choices, select the Open option.
Step 4 – Select the location of your project file, choose a black icon folder for your project folder, and see a personalized window open.
5. Features of Spring Boot Initializr
Spring Boot Initializr offers a number of innovative features in addition to the fundamental ones, making it a vital tool for Spring Boot developers. The following are some important enhanced features:
1. Customizing the Build Configuration
By selecting your preferred build tool, such as Maven or Gradle, you may change the build configuration of your project with Spring Boot Initializr.
Additionally, you can alter the project version, artifact ID, and group ID in your build settings.
2. Adding Custom Dependencies
You are able to add unique dependencies to your project using Spring Boot Initializr. When using third-party libraries or frameworks that are not included in the normal dependency list, this is especially helpful.
3. Generating Project Metadata
The project metadata that Spring Boot Initializr can produce includes a README file and a license file. When you wish to share your project with other developers, this is very useful.
4. Generating a Project Structure
You can create a project structure with Spring Boot Initializr that is tailored to your project's requirements. For your source code, resources, and test files, directories and files must be created.
6. Best Practices for Using Spring Boot Initializr
It's essential to keep to a few best practices in order to get the most out of Spring Boot Initializr. The guidance that follows will help you get the most out of this tool:
1. Understanding Spring Boot Initializr
It's essential to comprehend Spring Boot Initializr's purpose and operation before using it.
A web-based tool called Spring Boot Initializr makes it simple and quick for developers to create Spring Boot projects.
Developers can configure their projects using the user interface, which includes options for the project type, language, packaging, dependencies, and more.
2. Choosing the Right Project Type
Developers should choose the project type that best suits their needs while utilizing Spring Boot Initializr. There are several other project types available, including Kotlin, Gradle, and Maven.
Based on the project's requirements and the developers' knowledge of the tool, it's critical to pick the appropriate project type.
3. Choosing the Right Dependencies
A project can add any of the dependencies offered by Spring Boot Initializr. The dependencies that developers require and those that they can do without should be carefully considered.
The project may become overly complex and challenging to maintain if there are too many dependencies.
4. Customizing the Configuration
Developers can modify the default project settings that Spring Boot Initializr provides in order to meet their unique requirements.
This entails changing the application's settings, adding extra configuration files, and other things.
Performance and scalability can be improved for the project by customizing the setup.
5. Using a Version Control System
It's essential to use version control while managing applications projects. Popular version control systems like Git are integrated with Spring Boot Initializr.
Version control is a tool that developers should use to track project changes and communicate with other team members.
6. Keeping Dependencies Up to Date
Dependencies are updated frequently to fix performance issues and patch security flaws. To benefit from these upgrades, developers should frequently update the project's dependencies.
Through its user interface, Spring Boot Initializr makes it simple to update dependencies.
7. Documenting the Project
For an applications project to be maintained over time, documentation is crucial. Using tools like Swagger, Spring Boot Initializr offers alternatives for creating documentation.
To make a project easier to maintain and extend, developers should take the time to properly document it.
8. Managing Security
Every development project should be especially concerned with security. Options are available in Spring Boot Initializr for adding configuration and dependencies for security.
The project should be protected against potential difficulties by developers taking their security requirements into serious consideration.
9. Deploying the Project
The project needs to be deployed once it is finished. The Spring Boot Initializr project is deployable on a number of different platforms, including cloud-based services like Heroku.
The best deployment solution should be chosen after thorough consideration of the developer's deployment requirements.
7. Common Use Cases for Spring Boot Initializr
Web apps, microservices, and APIs are just a few of the projects that Spring Boot Initializr is helpful for. Projects with complex dependencies or those that call for rapid and simple setups will benefit most from this tool.
8. Frequently Asked Questions
1. What is the use of Spring Boot Initializr?
A web-based tool called Spring Boot Initializr enables programmers to rapidly and simply create Spring Boot projects.
Spring Boot Initializr has gained popularity among developers primarily to its simple setup procedure and user-friendly UI.
2. How do I Initialize a New Spring Boot Project?
Step 1: Go to https://start.spring.io to launch the Spring initializer.
Step 2: Name the Group and the Artifact. We have given the Artifact spring-boot-example and Group name com.demo.
Step 3: Then press the Generate button.
After we click the Create button, the project begins to be downloaded and packed in a .rar file.
Step 4: Get the RAR file out.
Step 5: Bring the folder in.


No comments:
Post a Comment