Hello, I will show you how to use PHP and MySQL to post form data with Ajax in this tutorial.
Using PHP and Ajax to post form data is a great method to improve our web applications' user experience. This technique makes our application more responsive and dynamic by enabling you to transmit form data to the server without having to refresh the page.
I'll provide a detailed process for doing this in this tutorial.
Table Content
1. Make Table
2. Setup Database Connection
3. Make HTML Form
4. Implement Ajax jQuery Code
5. PHP Code
6. Test Application
Make Table
I have a table called "user" in my PhyMyAdmin that has four fields: id, username, email, and password.
 CREATE TABLE `tbl_user` (
  `id` int(11) NOT NULL,
  `username` varchar(100) NOT NULL,
  `email` varchar(100) NOT NULL,
  `password` varchar(100) NOT NULL
) ENGINE=InnoDB DEFAULT CHARSET=utf8mb4 COLLATE=utf8mb4_general_ci;
Setup Database Connection
Here is the "dbconfig.php" file where I have set up the database connection based on the PDO extension.
 <?php

$db_host="localhost";
$db_user="root";
$db_password="";
$db_name="post_method_db";

try
{
	$db=new PDO("mysql:host={$db_host};dbname={$db_name}",$db_user,$db_password);
	$db->setAttribute(PDO::ATTR_ERRMODE, PDO::ERRMODE_EXCEPTION);
}
catch(PDOEXCEPTION $e)
{
	$e->getMessage();
}

?>
Make HTML Form
This is the "index.php" file. I have created a form in this file with the Bootstrap package for a better user experience.
I have added the submit button and three fields password, email address, and username inside the form.
I added a division element that uses the id attribute value "message" (id="message") to display the data register successfully message before closing the </form> tag.
 <form id="userForm" class="form-horizontal">

	<div class="form-group">
	<label class="col-sm-3 control-label">Username</label>
	<div class="col-sm-6">
	<input type="text" name="txt_username" class="form-control" placeholder="enter username" />
	</div>
	</div>

	<div class="form-group">
	<label class="col-sm-3 control-label">Email</label>
	<div class="col-sm-6">
	<input type="text" name="txt_email" class="form-control" placeholder="enter email" />
	</div>
	</div>

	<div class="form-group">
	<label class="col-sm-3 control-label">Password</label>
	<div class="col-sm-6">
	<input type="password" name="txt_password" class="form-control" placeholder="enter password" />
	</div>
	</div>

	<div class="form-group">
	<div class="col-sm-offset-3 col-sm-6 m-t-15">
	<button type="button" id="btn_register" class="btn btn-success">Register</button>
	</div>
	</div>

	<div class="form-group">
	<div id="message" class="col-sm-offset-3 col-sm-6 m-t-15"></div>
	</div>

</form>
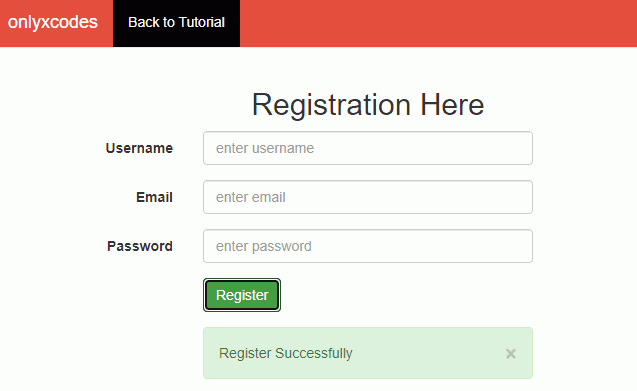
The form's User Interface displays this type.
Implement Ajax jQuery Code
The jQuery library is required to implement Ajax code. You can get it from the official jQuery website or use a Content Delivery Network (CDN) to reference it directly.
In my case, I included the jQuery library in my "index.php" file before beginning the Ajax code.
I then developed the jQuery code to use Ajax to handle the form submission.
When users click the register button, the form will be activated via the click() method. The click() method uses the value of the id attribute "btn_register" to identify the event of the register button being clicked.
I prevent the default form submission behavior using e.preventDefault().
I serialize the form data into a query string format using $(this).serialize().
I send the serialized data to "process.php" using the HTTP POST method.
On the success function, I display the server's response in the #message div tag.
To clear form data when the form is submitted, I lastly used the reset() function, which takes the form id #userForm.
 <script src="js/jquery-1.12.4-jquery.min.js"></script>

<script>

	$(document).on('click','#btn_register',function(e){

		e.preventDefault();

		var formData = $('#userForm').serialize();

		$.ajax({
			url: 'process.php',
			type: 'post',
			data: formData,
			success: function(response){
				$('#message').html(response);

			}
		});

		$('#userForm')[0].reset();

	});

</script>
PHP Code
This is our server file, or "process.php" file. This code uses the $.ajax() function to quietly communicate. It verifies that the password has six characters or more, the email is formatted correctly, and the form fields are not empty.
The user table will have new records inserted by this file if all of the above requirements are met without a problem.
<?php
require_once "dbconfig.php";
$username = $_POST["txt_username"];
$email = $_POST["txt_email"];
$password = $_POST["txt_password"];
if(empty($username)){
$errorMsg[]="Please enter username";
}
else if(empty($email)){
$errorMsg[]="Please enter email";
}
else if(!filter_var($email, FILTER_VALIDATE_EMAIL)){
$errorMsg[]="Please enter a valid email address";
}
else if(empty($password)){
$errorMsg[]="Please enter password";
}
else if(strlen($password) < 6 ){
$errorMsg[]="Please enter password at least 6 characters";
}
else
{
try
{
$stmt=$db->prepare("INSERT INTO tbl_user(username,
email,
password)
VALUES
(:uname,
:uemail,
:upassword)");
$stmt->bindParam(":uname",$username);
$stmt->bindParam(":uemail",$email);
$stmt->bindParam(":upassword",$password);
if($stmt->execute())
{
echo '<div class="alert alert-success"><button type="button" class="close" data-dismiss="alert">×</button>
Register Successfully
</div>';
}
}
catch(PDOException $e)
{
echo $e->getMessage();
}
}
if(isset($errorMsg))
{
foreach($errorMsg as $error)
{
echo '<div class="alert alert-danger"><button type="button" class="close" data-dismiss="alert">×</button>
'.$error.'
</div>';
}
}
?>Test this Application
The output of the above sample development is as follows:
I filled out the registration form's fields.
A bootstrap success box with the phrase "register successfully" is presented.
Once the registration process is finished, have a look at the user information that was recorded in the table.


No comments:
Post a Comment