In this tutorial, you will learn how to create a REST API with MySQL as a database and Node.js as the server-side execution. It will also make use of the Express.js framework to help us with our goal.
NoSQL databases, such as MongoDB, are the most popular database solution for Node.js applications. However, according to our customized requirements, Node.js also works well with relational databases like MySQL.
The most popular web framework for Node.js is ExpressJS. It is built on top of the Node.js HTTP module and includes routing, middleware, and a view system, among other features.
This tutorial will show you how to create a Rest API with Express and MySQL, as well as how to utilize the HTTP method in Node.js to do CRUD (Create, Read, Update, and Delete) operations.
Table Content
1. What We Build in this Application
2. Check Node and NPM Environment
3. Create Database and Table in MySQL
4. Set Up A New Application
5. Install Dependencies
6. Configure MySQL Database
7. The index.js File
8. The APIs We Created
9. Test APIs
1. What We Build in this Application
We'll be creating a student information application with first names, last names, and roll numbers in this article. Rest APIs will be developed for creating, reading, updating, and deleting student data.
Please install NodeJS and MySQL on your system before moving on to the next phase.
To build a new MySQL database and connect, I used the XAMPP server, which includes PHPMyAdmin.
2. Check Node and NPM Environment
I'm assuming you've had Node and NPM installed on your system.
If you have NodeJS and NPM installed on your system, you should check their environment.
Let's check the node version on your system by running the command below and seeing what happens.
node -vNow let's look at the result of the npm (node package manager) edition.
npm -v3. Create Database and Table in MySQL
Create a database with any name in your PhpMyAdmin.
I used the named database nodejs-mysql-express-restapi-db.
After creating the database, select it and run the SQL command below in the SQL tab to create the student table.
CREATE TABLE `student` (
  `id` int(11) NOT NULL,
  `firstname` varchar(30) NOT NULL,
  `lastname` varchar(30) NOT NULL,
  `roll_number` int(11) NOT NULL
) ENGINE=InnoDB DEFAULT CHARSET=utf8mb4;
4. Set Up A New Application
First foremost, you must create a root folder in your system where your new NodeJS application will be developed. My root folder's name kept NodeJS-MySQL-Express-REST-API.
Then you must navigate to the root folder you just created.
Open your command prompt and navigate to the root folder NodeJS-MySQL-Express-REST-API.
Look below for a screenshot of my root folder, which was created on my H:> drive.
Now, within the root folder, we run the following command to begin a new project:-
The npm init command would create a package.json file and question the user for information.
npm initIt will discuss the development of questions to help you set up your apps, such as the name, description, and other details.
Take a look at the codes below. I filled up the name, description, keyword, and author, but left the other of the fields blank.
package name: (nodejs-mysql-express-rest-api)
version: (1.0.0)
description: nodejs mysql express rest api crud example
entry point: (index.js)
test command:
git repository:
keywords: nodejs, mysql, express, restapi, crud
author: onlyxcodes
license: (ISC)
About to write to H:\Hamid\NodeJS-MySQL-Express-Rest-API\package.json:

{
  "name": "nodejs-mysql-express-rest-api",
  "version": "1.0.0",
  "description": "nodejs mysql express rest api crud example",
  "main": "index.js",
  "scripts": {
    "test": "echo \"Error: no test specified\" && exit 1"
  },
  "keywords": [
    "nodejs",
    "mysql",
    "express",
    "restapi",
    "crud"
  ],
  "author": "onlyxcodes",
  "license": "ISC"
}


Is this OK? (yes) yes
After that, open your project in an editor. I advise you to use the Visual Studio Code editor.
In the Visual Studio Code editor, I open my project.
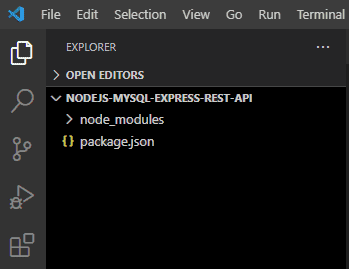
The package.json file is automatically created by npm in the root project folder on the left sidebar. It contains all of the information we just provided to generate this file. The index.js file is the entry point, as you can see.
5. Install Dependencies
After you've created the package.json file, you'll need to install the three dependencies listed below.
express:- enables middleware to reply to HTTP requests to be put up. Express is made with single-page, multi-page, and hybrid web apps in consideration.
mysql:- Node.js uses the MySQL module driver to interact with the MySQL database.
nodemon:- It will keep us from having to restart the server every time we make a change and will automatically refresh, saving us time. After making modifications to the files, the server will automatically restart.
Now run a single command to install them.
Select Terminal - New Terminal from the menu bar.
I've added - -save to the end of the command. It will include the above three dependencies (express, mysql, and nodemon) in our package.json file.
run the command below
npm install express mysql nodemon --saveThe last package.json file looks like this.
I've added this new script to package.json and scripts, respectively.
"serve": "nodemon index.js"
If you type npm run serve in the terminal, the nodemon will run the index.js file and, if you make any changes, it will immediately restart our server.
{
  "name": "nodejs-mysql-express-rest-api",
  "version": "1.0.0",
  "description": "nodejs mysql express rest api crud example",
  "main": "index.js",
  "scripts": {
    "test": "echo \"Error: no test specified\" && exit 1",
    "serve": "nodemon index.js"
  },
  "keywords": [
    "nodejs",
    "mysql",
    "express",
    "restapi",
    "crud"
  ],
  "author": "onlyxcodes",
  "license": "ISC",
  "dependencies": {
    "express": "^4.17.3",
    "mysql": "^2.18.1",
    "nodemon": "^2.0.15"
  }
}
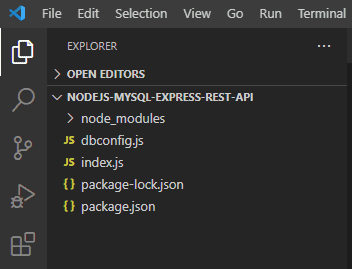
Cover the full directory structure, as well as the other two files (dbconfig.js and index.js) that we will generate in the following steps.
6. Configure MySQL Database
Make a new file called dbconfig.js. We set up the MySQL database connection in this file.
Using the require() function, we import the mysql module.
Create a MySQL database connection by invoking the createConnection() method and supplying detailed information on MySQL servers such as host, user, password, and database name, as shown below:
To connect to the MySQL database server, use the connect() method on the connection object:
If an error occurs, the connect() method accepts a callback function with the error parameter, which provides the detailed error.
Finally, we export the connection object with module.exports.
const mysql = require('mysql');
const connection = mysql.createConnection({
    host     : 'localhost',
    user     : 'root',
    password : '',
    database : 'nodejs-mysql-express-restapi-db'
});

connection.connect((error) => {
    if(error){
        console.log('database connection fail');
    }
});

module.exports = connection;
7. The index.js File
Make a file called index.js to store our Rest API code.
const express = require('express');
const connection = require('./dbconfig');

const app = express();

app.use(express.json());

app.get('/getall', (req, res) => {
    connection.query('SELECT * FROM student', (error, result) => {
        if (error) {
            res.send('error to fetch student all records')
        } else {
            res.send(result)
        }
    })
});

app.post('/create', (req, res) => {
    const data = req.body;
    connection.query('INSERT INTO student SET ?', data, (error, result, fields) => {
        if (error) throw error;
        res.send(result);
    })
})

app.put('/update/:id', (req, res) => {
    const data = [req.body.firstname, req.body.lastname, req.body.roll_number, req.params.id];
    connection.query('UPDATE student SET firstname = ?, lastname = ?, roll_number = ? WHERE id = ?', data, (error, result, fields) => {
        if (error) throw error;
        res.send(result);
    })
});

app.delete('/delete/:id', (req, res) => {
    const id = req.params.id;
    connection.query('DELETE FROM student WHERE id =' + id, (error, result) => {
        if (error) throw error;
        res.send(result);
    });
});

app.listen(5000);
Explanation:
First, we use the require() function to include the express module.
const express = require('express');The require() function is used to include the dbconfig.js file. Mysql database connection is stored in the dbconfig.js file. And the new connection object gets this file connection.
We'll use the connection object to run SQL queries.
const connection = require('./dbconfig');The express module provides a function as a response. This function returns an object that we may utilize to configure our app. In this example, we'll use the app object.
const app = express();In Express, what does 'app.use(express.json())' do?
The function app.use() adds a new middleware to the code. When a request comes in, Express will run the functions you gave to app.use() in the order you specified.
Express has a built-in middleware method called express.json(). It parses incoming JSON requests and saves the results in the req.body variable.
We need to implement the express.json() middleware to obtain data as JSON using the Content-Type: application/json.
app.use(express.json());The get(), post(), put(), and delete() methods provide routes for HTTP GET, POST, PUT, and DELETE requests, respectively, in the app object.
Get Student All Records
The app.get() method redirects HTTP GET requests to the '/getall' location with the callback function given.
The request and response (req, res) objects that executed our request are included in the callback function.
The student table of all records rows returned by the server is contained in the results object.
The res.send() function returns all records in JSON format from the table.
app.get('/getall', (req, res) => {
    connection.query('SELECT * FROM student', (error, result) => {
        if (error) {
            res.send('error to fetch student all records')
        } else {
            res.send(result)
        }
    })
});
Add Student
The app.post() method sends HTTP POST requests to the '/create' path, with the callback function supplied.
The request and response (req, res) objects that executed our request are included in the callback function.
Using req.body, you may get the data from an HTTP POST request.
We submit insert data requests in the req.body using the HTTP POST protocol. And the new data object is assigned to this request.
Apply a SQL insert query using the connection object. data, error, result, and fields are the four objects in the insert query.
The data object contains the insert data request that we enter in JSON format from req.body.
If an error occurs during data insertion, the error object sends the relevant error.
The rows of inserted records returned by the server are stored in the results object.
If accessible, the fields object contains additional metadata about the results.
The res.send() function transmits a response automatically. The data in the req.body is transferred in JSON format, hence the res.send() function returns a JSON response.
app.post('/create', (req, res) => {
    const data = req.body;
    connection.query('INSERT INTO student SET ?', data, (error, result, fields) => {
        if (error) throw error;
        res.send(result);
    })
})
Update Student Record
The app.put() method redirects HTTP PUT requests to the '/update/:id' location with the callback function provided.
We can define a variable that maps to the URL by adding a colon (:) to the path.
Our HTTP PUT request URL, for example, is http://localhost:5000/update. Here, we add the :id variable, which corresponds to the URL.
To edit a specific record, an id value must be included in the URL.
We'll use JSON format to change a record value in req.body.
Using req.body, you may get the data from an HTTP PUT request.
In the req.body, we first create a table for each field's first name, last name, and roll number.
Then there's the req.params object, which has properties that are mapped to the specified route "parameters." For example, we have the /update/:id route, followed by the "id" field in req.params.id.
And that the new data object holds all of the values.
Apply a SQL update query to the connection object. data, error, result, and fields are the four items in the update query.
If an error occurs during the data update process, the error object communicates the relevant error.
The results object contains the server's updated records rows.
If available, the fields object contains additional metadata about the results.
The res.send() function transmits a response automatically. The data in the req.body is transferred in JSON format, and the res.send() function sends an updated record response in JSON format.
app.put('/update/:id', (req, res) => {
    const data = [req.body.firstname, req.body.lastname, req.body.roll_number, req.params.id];
    connection.query('UPDATE student SET firstname = ?, lastname = ?, roll_number = ? WHERE id = ?', data, (error, result, fields) => {
        if (error) throw error;
        res.send(result);
    })
});
Delete Student Record
The app.delete() method redirects HTTP DELETE requests to the '/delete/:id' endpoint with the callback function given.
We can define a variable that maps to the URL by adding a colon (:) to the path.
Our DELETE API URL, for example, is http://localhost:5000/delete/. Here, we add the :id variable, which corresponds to the URL.
Each record in our student database has its id.
To delete a specific student record, an id value must be provided in the URL.
The properties of the req.params object are mapped to the named route "parameters." For example, we have the /delete/:id route, followed by the "id" field in req.params.id.
If we delete a certain id record from URL localhost:5000/delete/14, for example, The value of the :id variable will be 14.
The new id object holds an id value.
Apply a SQL delete query using the connection object. The error and result objects are both present in the delete query.
If an error occurs during the data deletion process, the error object will communicate the appropriate error.
The results object holds the server's erased answer.
The res.send() function sends a JSON-formatted deleted record response.
app.delete('/delete/:id', (req, res) => {
    const id = req.params.id;
    connection.query('DELETE FROM student WHERE id =' + id, (error, result) => {
        if (error) throw error;
        res.send(result);
    });
});
We configured the port number 5000 for our application using the app.listen() function. This port will be used to listen for requests from our application.
app.listen(5000);8. The APIs We Created
The table below shows the Rest APIs that will be tested using the Postman tool in the next stage.
| Rest API URL | HTTP Method | Description |
|---|---|---|
| /create | POST | Creating new record |
| /getall | GET | Display table all records |
| /update/:id | PUT | Update existing record with specific id |
| /delete/:id | DELETE | Delete existing record with specific id |
9. Test APIs
Before you can test APIs, you must first run your node application at the terminal and connect to your MySQL database.
In the localhost XAMPP server, I established my database. So, before testing APIs, I launched the XAMPP server and connected the database.
I used the npm run serve command to run my application.
I used the Postman tool to test all of the Rest APIs.
Create a New Student Record
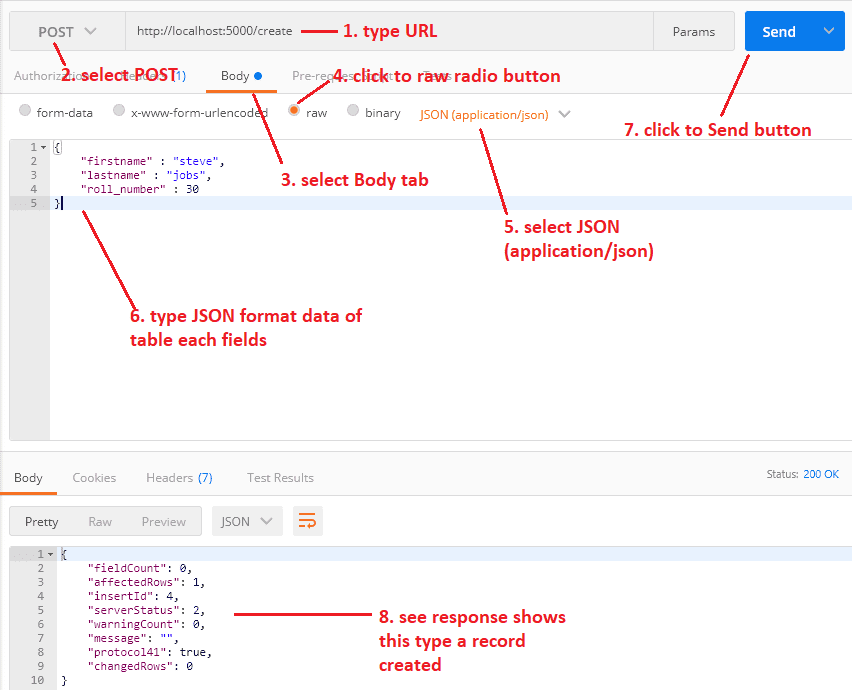
First, insert a new student record by going to this URL http:/localhost:5000/create, selecting the POST method, selecting the raw radio button in the Body tab, setting Content-Type="application/json" in the Headers tab, and pasting the JSON code below.
{
	"firstname" : "steve",
	"lastname" : "jobs"
	"roll_number" : 30
}
Also, have a look at the student table that was created.
Read Student All Record
To use the URL http:/localhost:5000/getall, we retrieve all student records from the database. After selecting the GET method, click the Send button.
Update Student Record by Id
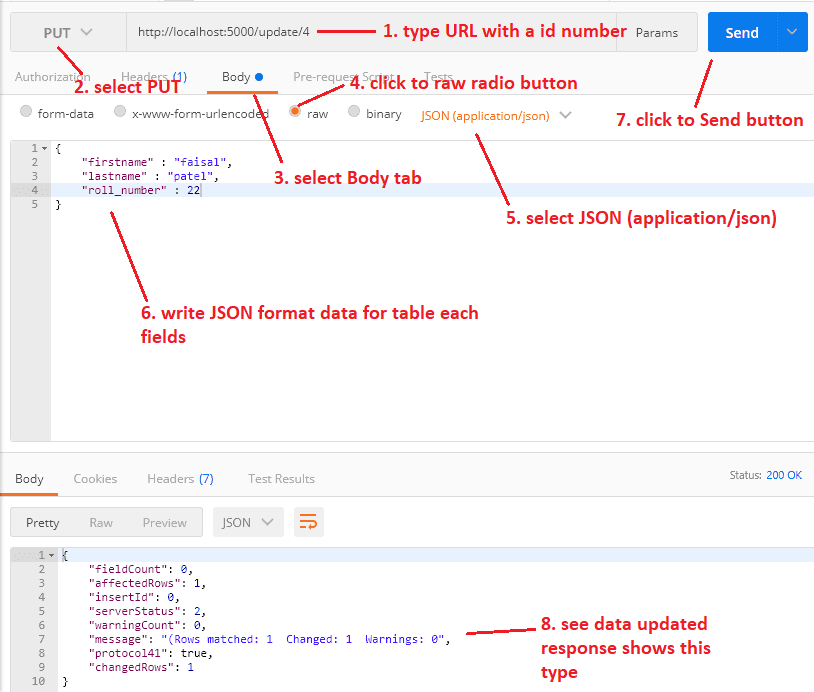
We update the existing student record by selecting the PUT method, selecting the raw radio button in the Body tab, setting Content-Type="application/json" in the Headers tab, and then pasting the following JSON code using this URL http:/localhost:8080/update/4.
Note: At the end of the URL, my record ID is 4. Since I updated the record for the Id number.
{
	"firstname" : "faisal",
	"lastname" : "patel"
	"roll_number" : 22
}
The record Id 4 record has also been updated.
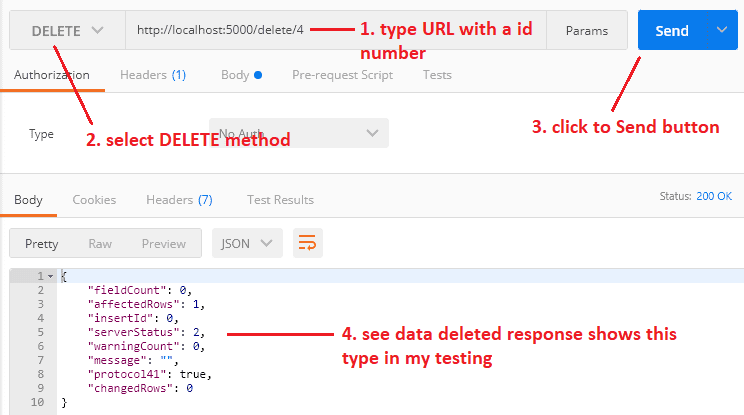
Delete Single Student Record by Id
http://localhost:8080/delete/4 is the URL to use. We delete a single record by selecting the DELETE method and sending it.
Note: The record ID at the end of the URL is 4. Because the 123rd Id was deleted.
The table was likewise cleared off the record.
Learn More:








No comments:
Post a Comment