In this tutorial, you'll learn how to use Node JS, MongoDB, and Express to create a REST API CRUD (Create, Read, Update, and Delete) operation.
MongoDB is a document-oriented NoSQL database that can hold a lot of information. MongoDB, unlike SQL databases, stores data in collections and documents rather than tables of rows and columns.
Each record in MongoDB is a document written in BSON (Binary Javascript Object Notation), a format comparable to JSON. BSON can be used to get JSON-formatted document information in your application.
One of the most popular web frameworks for node.js is ExpressJS. It is built on top of the node-js HTTP module and includes routing, middleware, and a view method, among other features.

Table Content
1. What We Build in this Application
2. Check Node, NPM, and MongoDB Environment
3. Create Database and Collection in MongoDB Compass
4. Set Up A New Project
5. Install Dependencies
6. MongoDB Database Configuration
7. Create Model For Schema
8. The index.js File
9. The APIs
10. Test APIs
1. What We Build in this Application
We'll be creating a book information application with names and prices in this tutorial. For generating, reading, updating, and removing a book, we'll create Rest APIs.
If you haven't already, install NodeJS, MongoDB, and MongoDB Compass on your system before moving on to the following stage.
About MongoDB Compass.
Rather than using the command line, we may use the MongoDB Compass GUI to rapidly generate, add, or delete data, as well as visualize, examine, and optimize it.
2. Check Node, NPM, and MongoDB Environment
Check the environment of NodeJS, NPM, and MongoDB if you have them installed on your system.
Let's check the node version on your system by running the command below and seeing what happens.
node -vHere the v14.16.1 is my node version but your version may be different.
v14.16.1Now let's look at the result of the npm (node package management) version.
npm -vMy npm version is 16.14.12, but it's possible that yours is different.
16.14.12Finally, look at the result and the MongoDB version.
mongo -versionThe output of the mongo -version command is shown below, however, it may differ in your instance.
MongoDB shell version v5.0.6
Build Info: {
    "version": "5.0.6",
    "gitVersion": "212a8dbb47f07427dae194a9c75baec1d81d9259",
    "modules": [],
    "allocator": "tcmalloc",
    "environment": {
        "distmod": "windows",
        "distarch": "x86_64",
        "target_arch": "x86_64"
    }
}
3. Create Database and Collection in MongoDB Compass
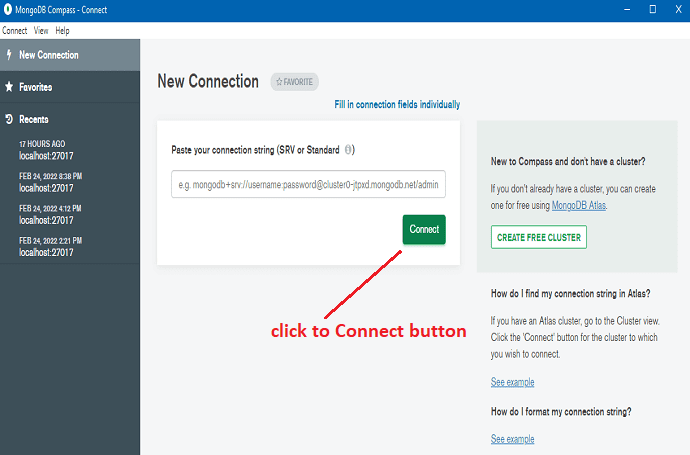
Open your Compass and click the connect button to connect to the MongoDB database.
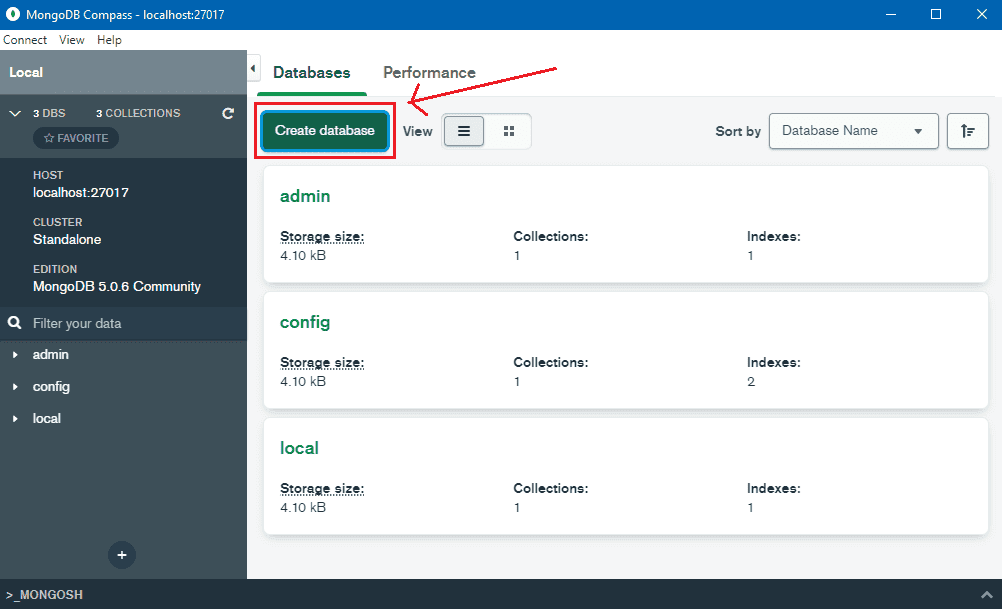
Click on the Create database button.
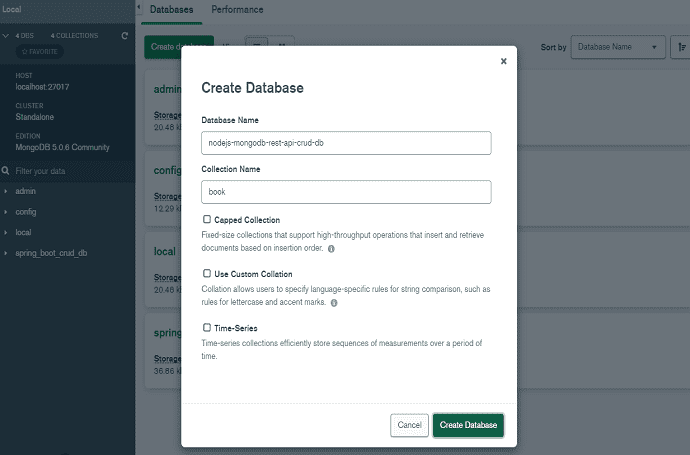
A popup window displays after pressing the Create database button.
After providing the Database Name and Collection Name, click the Create Database button. Take a look at the screenshots I mentioned earlier.
In this example, I utilized the nodejs-mongodb-rest-api-crud-db database and the book collection.
On the collection, we'll use the REST API to perform CRUD operations.
4. Set Up A New Project
First and foremost, you must create a root folder in your system where your new NodeJS project will be developed. NodeJS-MongoDB-REST-API was the name I used for the root folder.
Then you must navigate to the root folder you just created.
Open your command prompt and navigate to the root folder NodeJS-MongoDB-REST-API.
Look below for a screenshot of my root folder, which was created on my H:> drive.

Now, within the root folder, we run the following command to begin a new project.
npm initIt will discuss a variety of questions to help you get started with your apps, such as the name, description, and other details.
Take a look at the codes below. I filled up the name, description, keyword, and author, but left the other of the fields blank.
{
  "name": "nodejs-mongodb-rest-api",
  "version": "1.0.0",
  "description": "NodeJS MongoDB Rest API Example",
  "main": "index.js",
  "scripts": {
    "test": "echo \"Error: no test specified\" && exit 1"
  },
  "keywords": [
    "Express",
    "RestAPI",
    "MongoDB",
    "Mongoose",
    "CRUD"
  ],
  "author": "onlyxcodes",
  "license": "ISC"
}
After you've finished, open your project in Visual Studio Code.
Look root project folder left sidebar a package.json file available. It contains all of the information we just provided to generate this file. The index.js file is the entry point, as you can see.

5. Install Dependencies
After you've created the package.json file, you'll need to install the three dependencies listed below.
express:- in support of our backend server
nodemon:- It will save us from having to restart the server every time we make a change and will automatically reload, saving us time. After making modifications to the files, the server will automatically restart.
mongoose:- We utilize Mongoose, an Object Data Modelling (ODM) module that provides all necessary functions to access and operate with MongoDB, to access the database from express.
Now Install them by following single command.
Go to the top select Terminal - New Terminal.
run the below command
I've added - -save to the end of the command. It will include the following three dependencies (express, mongoose, and nodemon) in our package.json file
npm install express mongoose nodemon --saveThe last package.json file looks like this.
I've added this new script to package.json and scripts, respectively.
"serve": "nodemon index.js"
If you run "npm run serve" in the terminal, the nodemon will run the index.js file and, if you make any changes, it will immediately restart our server.
package.json
{
  "name": "nodejs-mongodb-rest-api",
  "version": "1.0.0",
  "description": "NodeJS MongoDB Rest API Example",
  "main": "index.js",
  "scripts": {
    "test": "echo \"Error: no test specified\" && exit 1",
     "serve": "nodemon index.js"
  },
  "keywords": [
    "Express",
    "RestAPI",
    "MongoDB",
    "Mongoose",
    "CRUD"
  ],
  "author": "onlyxcodes",
  "license": "ISC",
  "dependencies": {
    "express": "^4.17.3",
    "mongoose": "^6.2.4",
    "nodemon": "^2.0.15"
  }
}
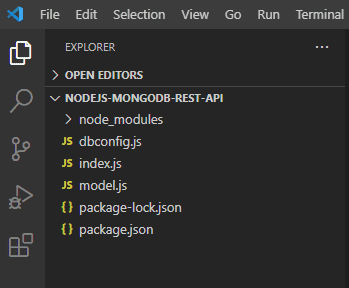
Display the current directory structure, as well as the other three files (dbconfig.js, model.js, and index.js) that will be created in the following steps.
6. MongoDB Database Configuration
Make a new file called dbconfig.js. The MongoDB database local configuration is set up in this file.
Using the require() function, we import the mongoose module. We may utilize the essential functions available in this module to create database connections after it is installed.
The connect() method is used to connect to MongoDB.
The mongodb:/ URI or the attributes host, database name, port, and options are sent to connect().
Our database (nodejs-mongodb-rest-api-crud-db) is configured to run locally on port 27017.
This file will be imported into the index.js file and communicated to the database.
const mongoose = require('mongoose');
mongoose.connect('mongodb://localhost:27017/nodejs-mongodb-rest-api-crud-db');
7. Create Model For Schema
Make a new file called model.js where all Schemas will be saved.
const mongoose = require('mongoose');

const bookSchema = new mongoose.Schema({
    name: String,
    price: Number
});

module.exports = mongoose.model('book', bookSchema);
Explanation:
First, we use the require() function to import the mongoose module.
Create a schema inside this file and define all the fields we need. The schema holds by bookSchema object.
A SchemaType must be assigned to every field in the schema.
Our fields have been defined. The name field is a String SchemaType, while the price field is a Number SchemaType.
A Mongoose schema corresponds to a MongoDB collection and specifies the format for all documents contained within that collection.
Next, create and access the Model.
Models are responsible for creating and reading documents from MongoDB's database layer.
The final step before beginning to create documents based on our book schema is to build a model based on the schema:
Mongoose creates a model for us when we call mongoose.model() on a schema.
The model() function copies all of the schema's declarations.
The first parameter is the name of the collection for which your model is built. Mongoose searches for the plural, lowercased version of your model name automatically.
If we use the book as an example, Mongoose will build a model for our books collection rather than our book collection.
8. The index.js File
Build a file called index.js to store our API code.
const express = require('express');
require('./dbconfig');
const bookModel = require('./model');

const app = express();

app.use(express.json());

app.post('/create', async (req, res) => {
    let data = new bookModel(req.body);
    const result = await data.save();
    res.send(result);
});

app.get('/getall', async (req, res) => {
    const data = await bookModel.find();
    res.send(data);
});

app.delete('/delete/:_id', async (req, res) => {
    const data = await bookModel.deleteOne(req.params);
    res.send(data);
});

app.put('/update/:_id', async (req, res) => {
    const data = await bookModel.updateOne(
        req.params,
        {
            $set: req.body
        }
    );
    res.send(data);
});

app.listen(5000);
Explanation:
First, we use the require() function to include the express module.
const express = require('express');The require() function is used to include the dbconfig.js file. The MongoDB database localhost connection is stored in the dbconfig.js file.
require('./dbconfig');Use the require() function to import the model.js file. The book collection schema is contained in this file.
const bookModel = require('./model');The express module provides a function as a result. This function returns an object that we may utilize to customize our app. In this example, we'll use the app object.
const app = express();In Express, what does 'app.use(express.json())' do?
The function app.use() adds a new middleware to the app. When a request comes in, Express will run the functions you gave to app.use() in the order you requested.
Express has a built-in middleware method called express.json(). It parses incoming JSON requests and saves the results in the req.body parameter.
We need to utilize the express.json() middleware because we want data to arrive as JSON with the Content-Type: application/json.
app.use(express.json());Add Books
The get(), post(), put(), and delete() methods provide routes for HTTP GET, POST, PUT, and DELETE requests, however, in the app object.
The app.post() method sends HTTP POST requests to the 'create' endpoint, with the callback function specified.
The request and response (req, res) objects that executed our request are included in the callback function.
Using req.body, you may get the data from an HTTP POST request.
The data for the bookModel request is sent in the req.body via the HTTP POST method.
The bookModel is the object we defined before in the model.js file. We export the model() method from the model.js file, which contains the book collection properties schema.
The save() function adds the document to the database if our application is properly executed.
The res.send() function transmits a response automatically. The data in the req.body is transferred in JSON format, hence the res.send() function returns a JSON response.
We handle the save() function response with async/await.
The Promise is returned by the await function. However, before waiting for a function that returns a Promise, the async function must be specified.
Because await returns the save() function response, we declared this function async. The response may include a document that has been inserted into the database as well as an appropriate error message.
app.post('/create', async (req, res) => {
    let data = new bookModel(req.body);
    const result = await data.save();
    res.send(result);
});
Get Book All Records
I explained the only codes that are required in this section.
I didn't clarify any of the already existing codes discussed above in the app.post() method.
The app.get() method redirects HTTP GET requests to the 'getall' endpoint with the callback function given.
The request and response (req, res) objects that executed our request are included in the callback function.
The find() method is used to select data from the books collection in MongoDB.
The res.send() function sends a JSON-formatted document response.
We handle the find() method response with async/await.
app.get('/getall', async (req, res) => {
    const data = await bookModel.find();
    res.send(data);
});
Delete Book Record
I also avoided explaining already existing codes in this area, which I described above with the app.post() method.
The app.delete() method redirects HTTP DELETE requests to the '\delete\:_id' URL, with the callback function supplied.
We can define a variable that maps to the URL by adding a colon (:) to the path.
Our DELETE API URL, for example, is http://localhost:5000/delete/. Here, we add the :_id variable, which goes to the URL.
Each document in our book collection has its own id.
To delete a specific book record, an id value must be included in the URL.
The deleteOne() method receives req.params and deletes a specified document from MongoDB.
The properties of the req.params object are mapped to the named route "parameters." For example, we have the /delete/:_id endpoint, followed by the "id" field in req.params.id.
If we delete a specific book record from URL localhost:5000/delete/52, for example, The value of the :id variable will be 52.
The res.send() function sends a JSON-formatted document response.
app.delete('/delete/:_id', async (req, res) => {
    const data = await bookModel.deleteOne(req.params);
    res.send(data);
});
Update Book Record
The app.put() method redirects HTTP PUT requests to the '\update\:id' endpoint with the callback function given.
We can define a variable that maps to the URL by adding a colon (:) to the path.
Our HTTP PUT request URL, for example, is http://localhost:5000/update. Here, we add the :_id variable, which goes to the URL.
To edit a specific document record, an id value must be included in the URL.
To update a specific document, we used the updateOne() method.
The updateOne() function takes two parameters.
req.params is the first parameter. The properties of the req.params object are mapped to the named route "parameters." For example, we have the /update/:_id route, followed by the "id" attribute in req.params.id.
The $set operator, which replaces the value of a document with the provided value, is the second parameter.
We'll use JSON format to replace a document value in req.body. Using req.body, you may get the data from an HTTP PUT request.
Finally, the res.send() function sends a JSON response to the document that has been changed.
app.put('/update/:_id', async (req, res) => {
    const data = await bookModel.updateOne(
        req.params,
        {
            $set: req.body
        }
    );
    res.send(data);
});
We configured the port number 5000 for our application using the app.listen() function. This port will be used to listen for requests from our application.
app.listen(5000);9. The APIs
The table below lists the Rest APIs that will be tested using the Postman tool in the next step.
| Rest APIs URL | HTTP Method | Description |
|---|---|---|
| /create | POST | Create new document |
| /getall | GET | get all document |
| /delete/:_id | DELETE | Delete existing document by id |
| /update/:_id | PUT | Update existing document by id |
10. Test APIs
Before you can test APIs, you must first run your node application at the terminal and connect your MongoDB Compass.
I used the npm run serve command to run my application.
I used the Postman tool to test all of the Rest APIs.
Create a New Book Document
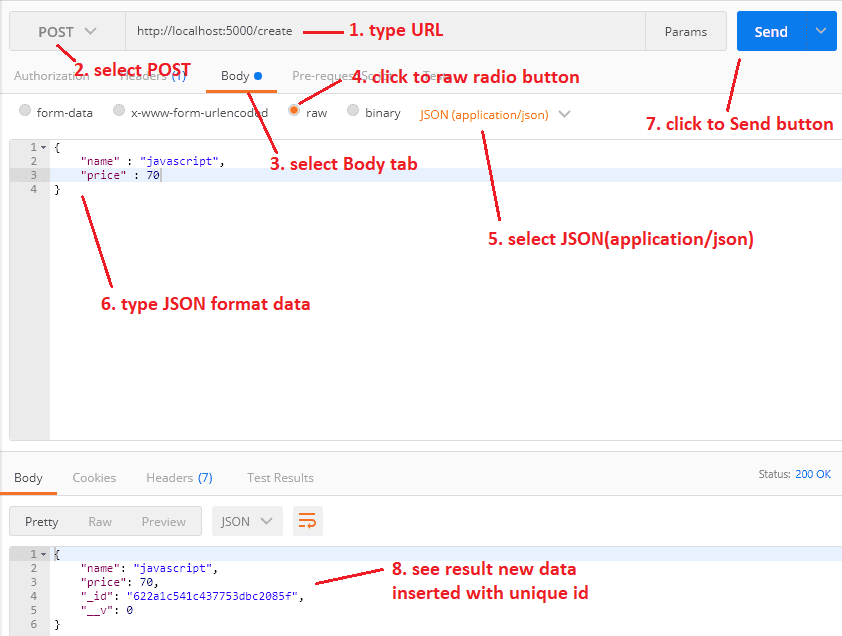
To begin, navigate to http:/localhost:5000/create, use the POST method, choose the raw radio button in the Body tab, set Content-Type="application/json" in the Headers tab, and paste the JSON code below.
{
	"name" : "javascript",
	"price" : 70
}
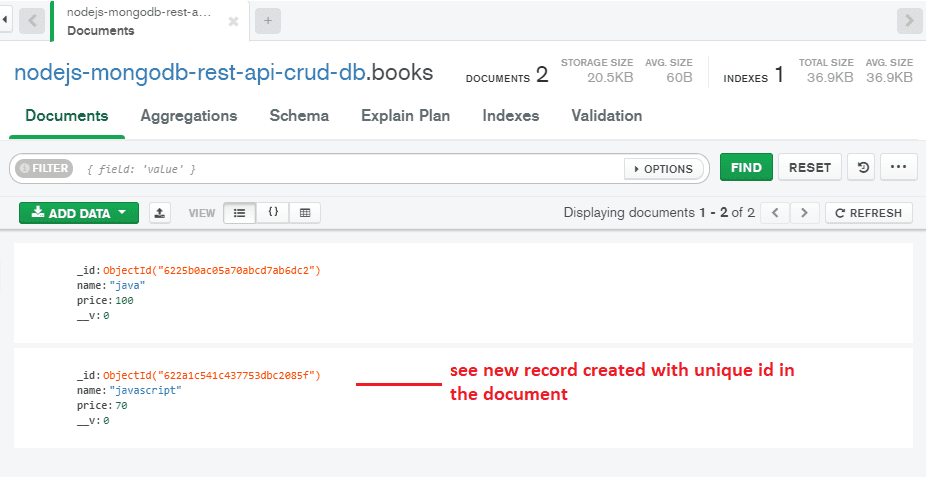
In the document, there is also a new record created with a unique id.
Read Book All Records
Using the URL http:/localhost:5000/getall, we obtain all book documents from the database. After selecting the GET method, click the Send button.

Delete Book Record
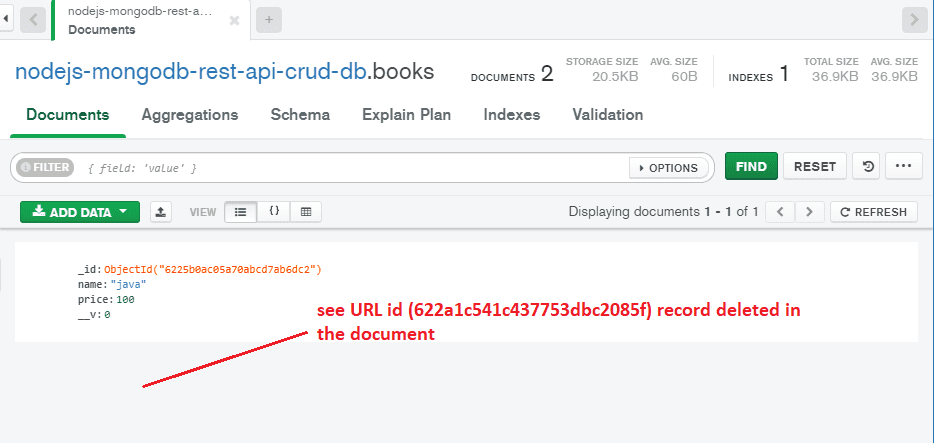
We delete a single document using this URL http:/localhost:8080/delete/ 622a1c541c437753dbc2085f, pick the DELETE method, and click the send button.
Note: The document ID at the end of the URL is 622a1c541c437753dbc2085f. Because the ID 622a1c541c437753dbc2085f has been deleted.

In addition, the record was deleted from the Document.
Update Book Record
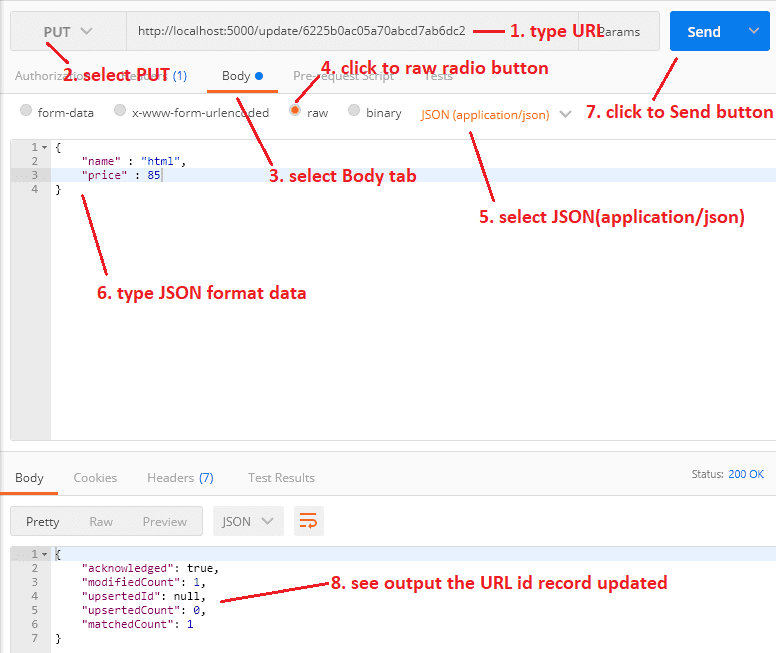
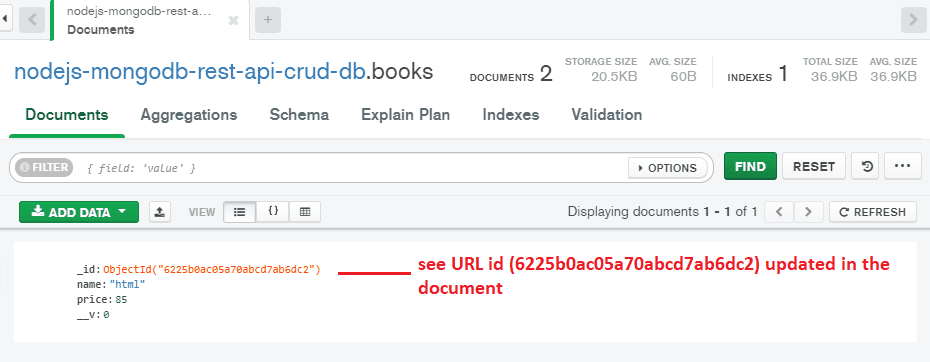
Using this URL http:/localhost:8080/update/ 6225b0ac05a70abcd7ab6dc2, we update the existing book document by selecting the PUT method, selecting the raw radio button in the Body tab, setting Content-Type="application/json" in the Headers tab, and then pasting the following JSON code.
Note: At the end of the URL, my Document Id is 6225b0ac05a70abcd7ab6dc2. Since I updated the record for the 6225b0ac05a70abcd7ab6dc2 Id number. In your scenario, different patterns or numbers may appear.
{
	"name" : "html",
	"price" : 85
}
The Document's Id 621a3f4972ff735fc897835c record has also been updated.
Learn More:


No comments:
Post a Comment