Welcome to a new tutorial. I've already written a PHP Rest API CRUD tutorial, but this one doesn't cover file upload to the server through Rest API.
When dealing with web services, uploading files may not be one of the most frequent tasks. When it comes to sending files to a server, however, it can be a time-consuming process.
This tutorial answered all of your questions. it's covered file upload via Rest API with validation, such as checking whether the file exists or not and requiring only valid file extensions to upload. The file size is also a consideration. Let's take a look at the PHP Rest API file upload code.

Project Set Up
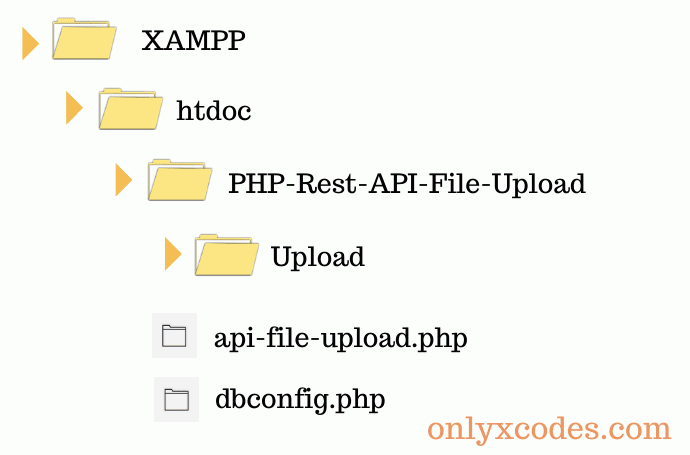
As you can see, I've built a PHP-Rest-API-file-Upload project root directory structure under the XAMPP server's htdocs folder.

Note: Before that, build a new folder called upload in your server's root directory, where our files will be saved after being uploaded using the Postman tool via the Rest API.
Create Database and Table
First, in phpMyAdmin, build a new database with any name you like. I've used "file_upload_restapi_db" in this case.
After you've created your database, copy the following SQL code and paste it into the available header section of your SQL option to create a table.
CREATE TABLE IF NOT EXISTS `tbl_image` (
  `id` int(11) NOT NULL,
  `name` varchar(255) NOT NULL
) ENGINE=InnoDB DEFAULT CHARSET=latin1;
dbconfig.php
Only with MySQLi extension, this file carries easy database setup code.
<?php

$DBhost = "localhost";
$DBuser = "root";
$DBpassword ="";
$DBname="file_upload_restapi_db";

$conn = mysqli_connect($DBhost, $DBuser, $DBpassword, $DBname);

if(!$conn){
	die("Connection failed: " . mysqli_connect_error());
}

?>
api-file-upload.php
This code will upload a file and insert its information in the database, including individual file or image validation and a reasonable message viewed in postman tool JSON format if an error is found.
<?php

header("Content-Type: application/json");
header("Acess-Control-Allow-Origin: *");
header("Acess-Control-Allow-Methods: POST");
header("Acess-Control-Allow-Headers: Acess-Control-Allow-Headers,Content-Type,Acess-Control-Allow-Methods, Authorization");

include 'dbconfig.php'; // include database connection file

$data = json_decode(file_get_contents("php://input"), true); // collect input parameters and convert into readable format

$fileName  =  $_FILES['sendimage']['name'];
$tempPath  =  $_FILES['sendimage']['tmp_name'];
$fileSize  =  $_FILES['sendimage']['size'];

if(empty($fileName))
{
	$errorMSG = json_encode(array("message" => "please select image", "status" => false));
	echo $errorMSG;
}
else
{
	$upload_path = 'upload/'; // set upload folder path

	$fileExt = strtolower(pathinfo($fileName,PATHINFO_EXTENSION)); // get image extension

	// valid image extensions
	$valid_extensions = array('jpeg', 'jpg', 'png', 'gif');

	// allow valid image file formats
	if(in_array($fileExt, $valid_extensions))
	{
		//check file not exist our upload folder path
		if(!file_exists($upload_path . $fileName))
		{
			// check file size '5MB'
			if($fileSize < 5000000){
				move_uploaded_file($tempPath, $upload_path . $fileName); // move file from system temporary path to our upload folder path
			}
			else{
				$errorMSG = json_encode(array("message" => "Sorry, your file is too large, please upload 5 MB size", "status" => false));
				echo $errorMSG;
			}
		}
		else
		{
			$errorMSG = json_encode(array("message" => "Sorry, file already exists check upload folder", "status" => false));
			echo $errorMSG;
		}
	}
	else
	{
		$errorMSG = json_encode(array("message" => "Sorry, only JPG, JPEG, PNG & GIF files are allowed", "status" => false));
		echo $errorMSG;
	}
}

// if no error caused, continue ....
if(!isset($errorMSG))
{
	$query = mysqli_query($conn,'INSERT into tbl_image (name) VALUES("'.$fileName.'")');

	echo json_encode(array("message" => "Image Uploaded Successfully", "status" => true));
}

?>
code explanation:
Row no 3 to 6 – See the code above. The following four headers have been added:
header("Acess-Control-Allow-Origin: *"); – This indicates that the request is for JSON data or format.
header("Acess-Control-Allow-Origin: *"); – This indicates that the request can be accepted from any place.
header("Acess-Control-Allow-Methods: POST"); – It indicates that only POST requests are allowed.
header("Acess-Control-Allow-Headers: Acess-Control-Allow-Headers, Content-Type, Acess-Control-Allow-Methods, Authorization"); – This header uses encryption because other people want to use their header to access the page
We've only allowed them to use the three headers above in this header. And additionally, include the Authorization property in this header because users can easily access authentication.
header("Content-Type: application/json");
header("Acess-Control-Allow-Origin: *");
header("Acess-Control-Allow-Methods: POST");
header("Acess-Control-Allow-Headers: Acess-Control-Allow-Headers,Content-Type,Acess-Control-Allow-Methods, Authorization");
Row no 8 – include the connection file for the database.
include 'dbconfig.php'; // include database connection fileRow no 10 – $data = json_decode(file_get_contents("php://input"), true);
php://input: – is a read-only stream that allows you to read raw data from the request body. ( according to php.net )
file_get_contents() – is the preferred way to read the contents of a file into a string. It will use memory mapping techniques if supported by your OS to enhance performance. ( according to php.net )
json_decode() – That function takes a JSON string and stores it in a PHP variable that can be an array or an object.
$data = json_decode(file_get_contents("php://input"), true); // collect input parameters and convert into readable formatRow no 12 to 14 – The "sendimage" file field key is stored in the PHP superglobal array $_FILES [ ]. The name, type, size, and temporary name of your uploaded file are all stored in this array.
$fileName = $_FILES['sendimage']['name'] – This array value determines the file's original name.
$tempPath = $_FILES['sendimage']['tmp_name'] – The temporary location that is uploaded to the file is retrieved from the it array. Use that information to move the uploaded file into our folder's path.
$fileSize = $_FILES['sendimage']['size'] – The file size is defined in bytes by this value of the array.
The file array key value ["sendimage"] is used to upload a new file to the server using the postman tool. This key is used to communicate with the array from the table field.
$fileName  =  $_FILES['sendimage']['name'];
$tempPath  =  $_FILES['sendimage']['tmp_name'];
$fileSize  =  $_FILES['sendimage']['size'];
Row no 16 to 20 – if condition, the empty() function verifies that the file value is not null.
if(empty($fileName))
{
	$errorMSG = json_encode(array("message" => "please select image", "status" => false));
	echo $errorMSG;
}
Within else condition,
Row no 23 – Create the $upload_path variable and save the path to the upload folder where the file will be stored on the server.
$upload_path = 'upload/'; // set upload folder path Row no 25 – That code obtains information about a file path and stores it in the variable $fileExt.
The pathinfo() function delivers information about the path to a file. Only the extension is returned by PATHINFO_EXTENSION.
The strtolower() function lowercases all characters in a string.
$fileExt = strtolower(pathinfo($fileName,PATHINFO_EXTENSION)); // get image extensionRow no 28 – Using the array() function, create an array with the valid image extensions jpeg, jpg, png, and gif. This array is assigned to the variable $valid_extensions.
// valid image extensions
$valid_extensions = array('jpeg', 'jpg', 'png', 'gif');
Row no 31 – Enable valid file or image formats with this if condition check.
Understand this condition,
in_array($fileExt, $valid_extensions)
The $fileExt and $valid_extensions parameters are passed to the in_array() function.
The $fileExt variable received file details, such as the name, which we discussed in the code for Row no 25.
The array values jpeg, jpg, png, and gif, which we discussed above in Row no 28 code, are contained in the $valid_extensions variable.
The in_array() function first looks up file information in the $fileExt variable, then looks up the file extension values jpeg, jpg, png, and gif in the $valid_extensions array.
If the condition is valid, continue.
// allow valid image file formats
if(in_array($fileExt, $valid_extensions))
{
Row no 34 – The file_exists() function is used to determine whether or not the uploaded file exists on the server.
//check file not exist our upload folder path
if(!file_exists($upload_path . $fileName))
{
Row no 37 to 39 – If the condition check is valid, the file size must be at least 5 MB.
If the above conditions are met, the move_uploaded_file() function will move the file from the temporary location to the upload folder path.
if($fileSize < 5000000){
	move_uploaded_file($tempPath, $upload_path . $fileName); // move file from system temporary path to our upload folder path
}
After else condition over,
Row no 59 to 64 – if condition, If the $errorMSG variable does not contain any errors, applied the insert query in the mysqli_query() function.
if(!isset($errorMSG))
{
	$query = mysqli_query($conn,'INSERT into tbl_image (name) VALUES("'.$fileName.'")');

	echo json_encode(array("message" => "Image Uploaded Successfully", "status" => true));
}
Note:- I have not explained any else condition; as you can see, all else conditions detect a particular error message, and all messages are passed through the json_encode() function, which includes the array() function. As well as assigning to the $errorMSG variable.
If an error message appears when uploading a file from the Rest API, To quickly identify unique error messages inside the Postman tool
Test Application
Some people ask a few questions as well.
How do I upload a file to Rest API and How do I upload a file to a post request. Don't worry, the test example covers all questions and answers.
For best practices in Rest API and Web services, I suggest using Postman.
To use this Rest API to upload a file, go to http://localhost/PHP-Rest-API-File-Upload/api-file-upload.php
1. Select the POST method
2. select the Body tab
Click the form-data tab in the Body tab and type "sendimage" as a key.
You'll notice a hidden drop-down menu that says Text as default. change Text to File, You can choose any file format from the system, such as a photo.

choose file

Information from website forms is frequently sent to APIs as multipart/form-data. Using the form-data Body tab in Postman, you can implement this. You may submit key-value pairs and define the content type using form-data.
4. To upload an image, click the Send button.
See the full screenshot below. Using the Postman tool, I uploaded an image to the server through the Rest API.

As you can see, the image information has been properly stored in the database table.

I hope you've enjoyed this tutorial example code demo.
Download Codes


how can i pass api value in front end php code
ReplyDeleteare you using the postman tool?
DeleteHi, I did can submit file and text input from my form?
ReplyDeleteYes, you can
DeleteThank you so much this is really helpful
ReplyDeleteWelcome, keep visiting danish
Deletethank you so much
ReplyDeleteWelcome keep visiting
Deletewow - this is great! Really very cool stuff and works fine!! May I ask an advanced question? I'm trying to use this script to add some php PDF-file processing. The upload will be only temporary. Mainly I want the pdf file to go through mikehaertl\pdftk. I made some other experiments with that library to get it running and to know how to work with pdftk.
ReplyDeleteI put "use mikehaertl\pdftk\Pdf;" at the top of the php file. This seems okay.
Then I decided to add some code in your script:
// check file size '5MB'
if($fileSize < 5000000){
move_uploaded_file($tempPath, $upload_path . $fileName); // move file from temp to specified upload folder
$finalFile = 'upload/'.$fileName;
// here we need to process it with my pdftk script....
// Get form data fields
$pdf = new Pdf($finalFile);
$pdfdata = $pdf->getDataFields();
if ($pdfdata === false) {
$errorMSG = json_encode(array("message" => "Sorry to say, something while pdftk processing went wrong!", "status" => false));
echo $errorMSG;
}
// Get data as array
$arr = (array) $pdfdata;
$arr = $pdfdata->__toArray();
But Postman gives HTTP Error 500.
The error already accuors with only adding the line
$pdf = new Pdf($finalFile);
What might be my mistake?
Great code, Thank you!
ReplyDeleteThank you keep visiting
Deletehello friend i am facing error undefined index: 'sendimage' can you please help me
ReplyDeletethe sendimage is key to communicate database field
Deleteya i had declared sendimage in postman but i am facing the above error
Deletethank you you're code works great
ReplyDeleteThank you vivek keep visiting
DeleteI got this error. Please give me a solution sir.
ReplyDeleteNotice: Undefined index: sendimage in C:\xampp\htdocs\PHP-Rest-API-File-Upload\api-file-upload.php on line 14
Notice: Trying to access array offset on value of type null in C:\xampp\htdocs\PHP-Rest-API-File-Upload\api-file-upload.php on line 14
Notice: Undefined index: sendimage in C:\xampp\htdocs\PHP-Rest-API-File-Upload\api-file-upload.php on line 15
Notice: Trying to access array offset on value of type null in C:\xampp\htdocs\PHP-Rest-API-File-Upload\api-file-upload.php on line 15
{
"message": "please select image",
"status": false
}
delete your web cookies,catched files and try again
Delete