Hi mates, in today's tutorial, after a long time, you can learn how to sending email using Spring Boot Rest API. A popular feature required in many business backend applications is to send an email. And email is a common way of communicating with end-users asynchronously.
We can need to send various types of emails to users of the application, such as registration verification email, password reset email, etc.
This tutorial demonstrates how to do it Spring Boot Rest API to send various types of email such as plain text email, an email with a file attachment, email in HTML format, and an inline-image.
Let's accomplish these features above to help incorporate the Spring framework.
Table Content
1. Create a New Spring Boot Project
2. pom.xml file
3. Create Model Class
4. Create Service Class
5. Create Controller Class
6. Spring Boot Main Class
7. Test Application
1. Creating A New Spring Boot Project
Step 1:
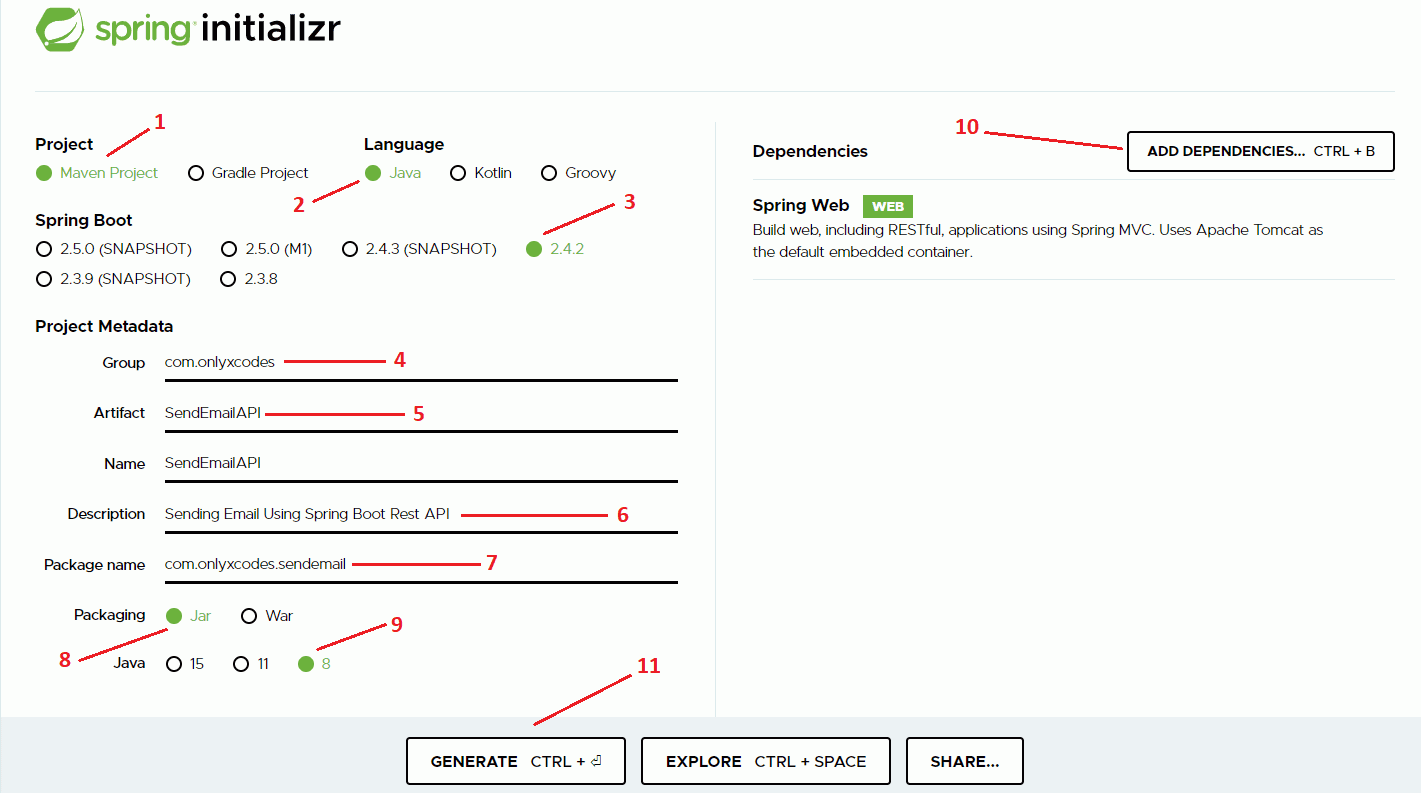
As shown in the following step, go to https://start.spring.io/ and bootstrap your new Spring Boot project.
Select Project Maven, Select Language Java and Select Version 2.4.2 Spring Boot. Friend These steps are chosen by default by the website Spring Initializr.
Project Metadata
Group – com.onlyxcodes. It is a common package name
Artifact – SendEmailAPI. It's our name for a project.
Description – Apply a few short details of the project, such as sending an email using Spring Boot Rest API.
Package Name – com.onlyxcodes.mvcapp. Within that package, we will configure a few other packages and classes and execute our application.
Packaging – Select Jar. It includes the appropriate jar files.
Java – I chose Java 8 because this version was installed on my system. But if you use one on your system, you can choose between 11 and 15 versions.
Click on the ADD DEPENDENCIES button on the right-hand sidebar.
Search and include Spring Web Dependence after opening a custom window.
Finally, in the bottom section, click on the GENERATE button to download the project zip file automatically.
Step 2:
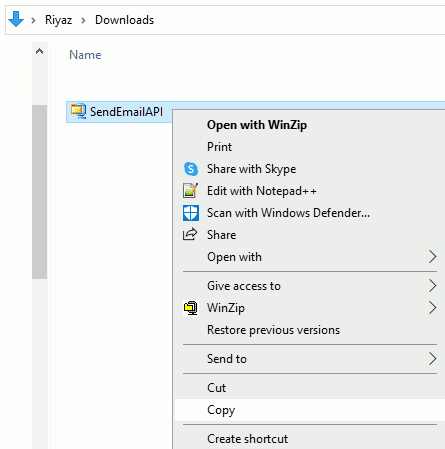
Copy the zip project file from the folder path to the download folder and set your distinct drive path.
Step 3:
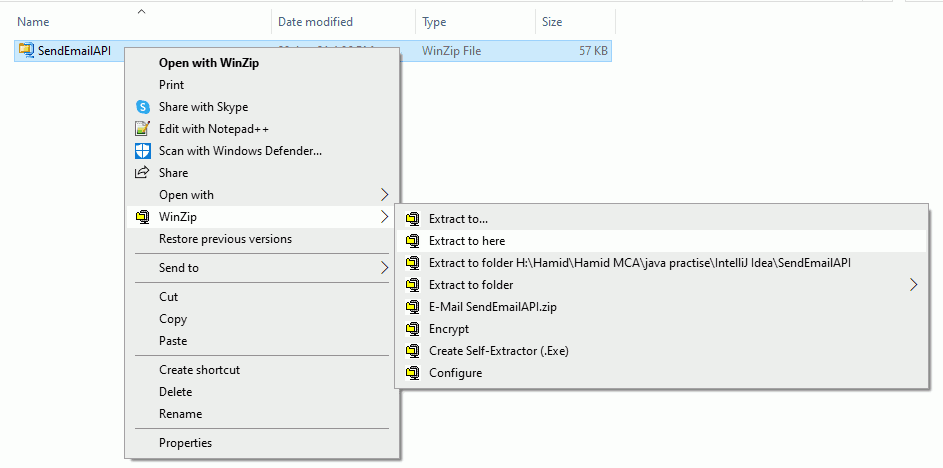
Extract project files from a zip file
Step 4:
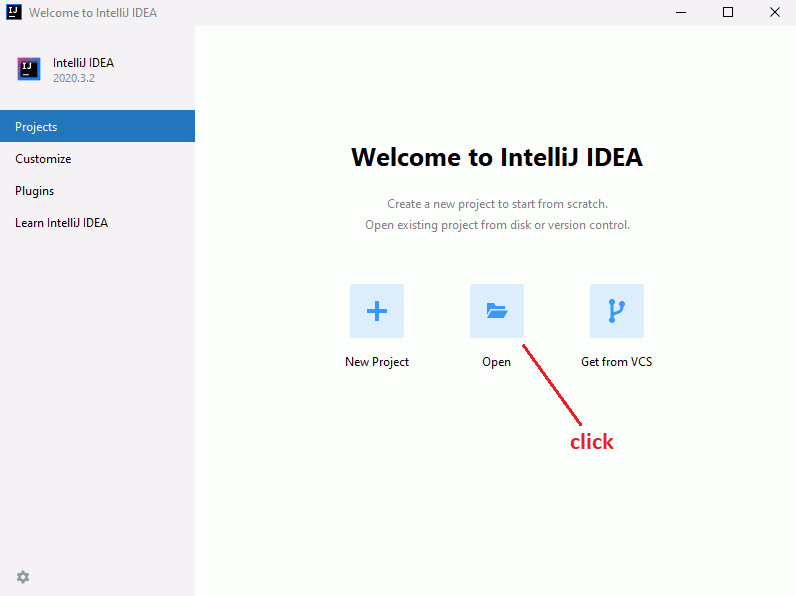
Open the IntelliJ IDEA tool. Click on the Open option to see the three options available.
Step 5:
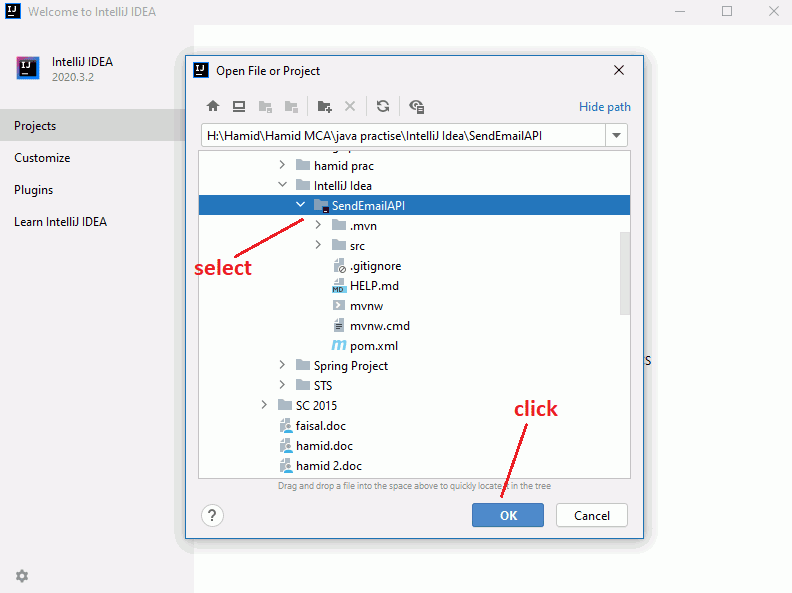
See the opening of a custom window, select the location of your project file and select a black icon folder for your project folder.
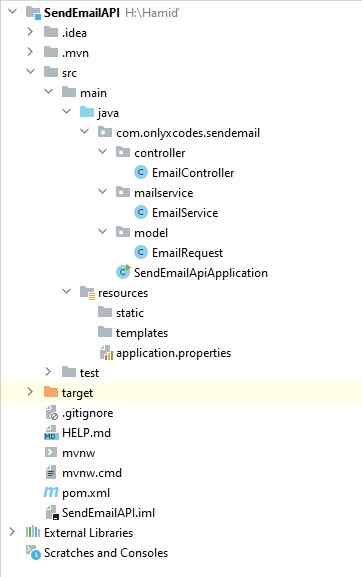
See the full project directory structure ahead, as well as additional packages that we are going to make in this project.
2. pom.xml
Auto-configuration itself is provided by Spring Boot. At the time when we bootstrapped our project, we used maven. So the spring boot automatically configures all of our dependencies as well as a starter module.
<?xml version="1.0" encoding="UTF-8"?>
<project xmlns="http://maven.apache.org/POM/4.0.0" xmlns:xsi="http://www.w3.org/2001/XMLSchema-instance"
	xsi:schemaLocation="http://maven.apache.org/POM/4.0.0 https://maven.apache.org/xsd/maven-4.0.0.xsd">
	<modelVersion>4.0.0</modelVersion>
	<parent>
		<groupId>org.springframework.boot</groupId>
		<artifactId>spring-boot-starter-parent</artifactId>
		<version>2.4.2</version>
		<relativePath/> <!-- lookup parent from repository -->
	</parent>
	<groupId>com.onlyxcodes</groupId>
	<artifactId>SendEmailAPI</artifactId>
	<version>0.0.1-SNAPSHOT</version>
	<name>SendEmailAPI</name>
	<description>Sending Email Using Spring Boot Rest API</description>
	<properties>
		<java.version>1.8</java.version>
	</properties>
	<dependencies>
		<dependency>
			<groupId>org.springframework.boot</groupId>
			<artifactId>spring-boot-starter-web</artifactId>
		</dependency>

		<dependency>
			<groupId>org.springframework.boot</groupId>
			<artifactId>spring-boot-starter-mail</artifactId>
			<version>2.4.2</version>
		</dependency>

		<dependency>
			<groupId>org.springframework.boot</groupId>
			<artifactId>spring-boot-starter-test</artifactId>
			<scope>test</scope>
		</dependency>

	</dependencies>

	<build>
		<plugins>
			<plugin>
				<groupId>org.springframework.boot</groupId>
				<artifactId>spring-boot-maven-plugin</artifactId>
			</plugin>
		</plugins>
	</build>

</project>
See the pom.xml file above. I have externally added spring-boot-starter-mail dependency. Use this dependency to send mail to our application since the dependencies of the JavaMail API will be dragged.
<dependency>
	<groupId>org.springframework.boot</groupId>
	<artifactId>spring-boot-starter-mail</artifactId>
	<version>2.4.2</version>
</dependency>
Friends if you are a Gradle user, then in your build.gradle file, you should add the following dependency.
compile ('org.springframework.boot:spring-boot-starter-mail')Create a Model Class
3. EmailRequest.java
Build an EmailRequest class. It is a simple model class comprising three attributes that are to, subject, and message for sending email requests.
To encapsulate the specifics of an email message and content, we use this class as an argument for our EmailService.java class.
package com.onlyxcodes.sendemail.model;

public class EmailRequest {

    private String to;
    private String subject;
    private String message;

    public String getTo() {
    	return to;
    }

    public void setTo(String to) {
    	this.to = to;
    }

    public String getSubject() {
        return subject;
    }

    public void setSubject(String subject) {
        this.subject = subject;
    }

    public String getMessage() {
        return message;
    }

    public void setMessage(String message) {
        this.message = message;
    }

    @Override
    public String toString() {
        return "EmailRequest{" +
                "to='" + to + '\'' +
                ", subject='" + subject + '\'' +
                ", message='" + message + '\'' +
                '}';
    }
}
Create a Service Class
4. EmailService.java
Build an EmailService class. This class will provide 4 separate methods for sending emails from the Rest API. This class was separately created from the controller.
1. sendEmail() – Send simple plain text email with this method.
2. sendWithAttachment() – Send an email with an attachment file using this method.
3. sendHtmlTemplate() – Send an HTML email format with this method.
4. sendEmailInlineImage() – This method sends inline-image stuff to emails.
We implement the four methods above under the below class.
@Service
public class EmailService
{
	// all methods codes here
}
Let's see all the methods with code summaries, one by one.
Note: To send emails from our application, I configure SMTP server settings for every method.
4.1 Send Simple Email
By this method, compose and send a simple plain text email first.
public boolean sendEmail(String subject, String message, String to)
{
    boolean foo = false; // Set the false, default variable "foo", we will allow it after sending code process email

    String senderEmail = ""; // your gmail email id
    String senderPassword = ""; // your gmail id password

    // Properties class enables us to connect to the host SMTP server
    Properties properties = new Properties();

    // Setting necessary information for object property

    // Setup host and mail server
    properties.put("mail.smtp.auth", "true"); // enable authentication
    properties.put("mail.smtp.starttls.enable", "true"); // enable TLS-protected connection
    properties.put("mail.smtp.host", "smtp.gmail.com"); // Mention the SMTP server address. Here Gmail's SMTP server is being used to send email
    properties.put("mail.smtp.port", "587"); // 587 is TLS port number

    // get the session object and pass username and password
    Session session = Session.getDefaultInstance(properties, new Authenticator()
    {
        protected PasswordAuthentication getPasswordAuthentication(){

			return new PasswordAuthentication(senderEmail, senderPassword);
        }
    });

    try {

        MimeMessage msg = new MimeMessage(session); // Create a default MimeMessage object for compose the message

        msg.setFrom(new InternetAddress(senderEmail)); // adding sender email id to msg object

        msg.addRecipient(Message.RecipientType.TO, new InternetAddress(to)); // adding recipient to msg object

        msg.setSubject(subject); // adding subject to msg object
        msg.setText(message); // adding text to msg object

        Transport.send(msg); // Transport class send the message using send() method
        System.out.println("Email Sent Wtih Attachment Successfully...");

        foo = true; // Set the "foo" variable to true after successfully sending emails

    }catch(Exception e){

            System.out.println("EmailService File Error"+ e);
    }

    return foo; // and return foo variable
 }
Code Explanation:
SMTP (Simple Mail Transfer Protocol) is the protocol responsible for transmitting e-mails. Using an example of the utility class called Properties, the specific properties of the host email provider are set. These properties help us communicate to a host SMTP server, which is Gmail in our example.
Properties properties = new Properties();Config host settings such as authentication allow TLS-protected connectivity, and its port number 587 using Properties object setup. And we use the Gmail SMTP server to set up mail servers here.
More Java programmers are also using the localhost server to send spring boot emails.
properties.put("mail.smtp.auth", "true"); // enable authentication
properties.put("mail.smtp.starttls.enable", "true"); // enable TLS-protected connection
properties.put("mail.smtp.host", "smtp.gmail.com"); // Mention the SMTP server address. Here Gmail's SMTP server is being used to send email
properties.put("mail.smtp.port", "587"); // 587 is TLS port number
Obtain the default session object using the Session.getDefaultInstance() method. If there is no default configuration yet, a new Session object will be generated and installed by default.
PasswordAuthentication: Found in Package javax.mail. It is the Authenticator's username and password holder, class.
The method getPasswordAuthentication() invokes the Authenticator class contained in the package javax.mail. When password authentication is necessary, this method is called.
Session session = Session.getDefaultInstance(properties, new Authenticator()
{
    protected PasswordAuthentication getPasswordAuthentication(){

                return new PasswordAuthentication(senderEmail, senderPassword);
    }
});
Discussion within try/catch block :
You need to transfer the Session Object in the MimeMessage class creator to construct the message.
To store data such as from, to, subject, and the message body, the MimeMessage msg object will be used.
An email address that includes support for defining an email address is represented by the InternetAddress() class.
The MimeMessage class offers a variety of methods for storing information in an object. I've used the following approach here.
public void addRecipient(Message.RecipientType type, Address address) – It is used to append the registered address to the type of recipient.
Here is the description of the elements.
- type − TO, CC, or BCC would be specified for this. CC contains Carbon Copy here, and Black Carbon Copy is contained by BCC. Example: Message.RecipientType.To for the message.
- addresses − This is an ID with an e-mail. When specifying email IDs, we've used the above InternetAddress() method.
For message processes, the transport class is used. To send a message, this class uses the SMTP protocol. That's it. You sent an SMTP email using the Java Mail API.
The method send() is used to send a message
try {

    MimeMessage msg = new MimeMessage(session); // Create a default MimeMessage object for compose the message

    msg.setFrom(new InternetAddress(senderEmail)); // adding sender email id to msg object

    msg.addRecipient(Message.RecipientType.TO, new InternetAddress(to)); // adding recipient to msg object

    msg.setSubject(subject); // adding subject to msg object
    msg.setText(message); // adding text to msg object

    Transport.send(msg); // Transport class send the message using send() method
    System.out.println("Email Sent Wtih Attachment Successfully...");

    foo = true; // Set the "foo" variable to true after successfully sending emails

}catch(Exception e){

    System.out.println("EmailService File Error"+ e);
}
4.2 Send Email with Attachment
Easy messaging often isn't appropriate in Spring Boot for our use cases. For instance, you want to send your resume with an attached pdf or document file to the company for jobs.
This method sends an attachment file email like I attach and sends a pdf book file.
public boolean sendWithAttachment(String subject, String message, String to)
{
    boolean foo = false; // Set the false, default variable "foo", we will allow it after sending code process email

    String senderEmail = ""; // your gmail email id
	String senderPassword = ""; // your gmail id password

    //Properties class enables us to connect to the host SMTP server
    Properties properties = new Properties();

    //Setting necessary information for object property

    //Setup host and mail server
    properties.put("mail.smtp.auth", "true"); // enable authentication
    properties.put("mail.smtp.starttls.enable", "true"); // enable TLS-protected connection
    properties.put("mail.smtp.host", "smtp.gmail.com"); // Mention the SMTP server address. Here Gmail's SMTP server is being used to send email
    properties.put("mail.smtp.port", "587"); // 587 is TLS port number

    // get the session object and pass username and password
    Session session = Session.getDefaultInstance(properties, new Authenticator()
    {
        protected PasswordAuthentication getPasswordAuthentication(){

			return new PasswordAuthentication(senderEmail, senderPassword);
        }
    });

    try {

        MimeMessage msg = new MimeMessage(session); // Create a default MimeMessage object for compose the message

        msg.setFrom(new InternetAddress(senderEmail)); // adding sender email id to msg object

        msg.addRecipient(Message.RecipientType.TO, new InternetAddress(to)); // adding recipient to msg object

        msg.setSubject(subject); // adding subject to msg object

        // sets file location
        String path = "C:\\Users\\Public\\Downloads\\css_tutorial.pdf";

        MimeMultipart mimeMultipart = new MimeMultipart(); // create MimeMultipart object

        MimeBodyPart textMime = new MimeBodyPart(); // create first MimeBodyPart object textMime for containing the message

        MimeBodyPart fileMime = new MimeBodyPart(); //create second MimeBodyPart object fileMime for containing the file

        textMime.setText(message); //sets message to textMime object

        File file = new File(path); //Initialize the File and Move Path variable
		fileMime.attachFile(file); //attach file to fileMime object

        //The mimeMmultipart adds textMime and fileMime to the
        mimeMultipart.addBodyPart(textMime);
        mimeMultipart.addBodyPart(fileMime);

        msg.setContent(mimeMultipart); // Sets the mimeMultipart the contents of the msg

        Transport.send(msg); // Transport class send the message using send() method
        System.out.println("Email Sent With Attachment Successfully...");

        foo = true; // Set the "foo" variable to true after successfully sending emails with attchment

    }catch(Exception e){

        System.out.println("EmailService File Error"+ e);
    }

    return foo; // and return foo variable
}
Code Explanation:
I clarify unique codes, Friends since I have already covered host settings and other summaries of codes above the basic email sending process.
As you can see, in the path variable, the code sets the location of a PDF file.
String path = "C:\\Users\\Public\\Downloads\\css_tutorial.pdf";The creation of MIMEMultipart is to say, "I have more than one part".
There are many sections in the MimeMultipart object in which each part is described as a BodyPart form whose subclass, MimeBodyPart, can take a file as its material.
MimeMultipart mimeMultipart = new MimeMultipart(); // create MimeMultipart objectCreates the textMime MimebodyPart object for a message
MimeBodyPart textMime = new MimeBodyPart(); // create first MimeBodyPart object textMime for containing the messagecreate the fileMime object MimebodyPart to contain our file.
MimeBodyPart fileMime = new MimeBodyPart(); //create second MimeBodyPart object fileMime for containing the fileSet the message to a textMime object with the message.
textMime.setText(message); //sets message to textMime objectInitialize a file and set the variable path to. Attach the file to an object called fileMime.
File file = new File(path); //Initialize the File and Move Path variable
fileMime.attachFile(file); //attach file to fileMime object
Adds parts of both textMime and fileMime to the mimeMultipart object
//The mimeMmultipart adds textMime and fileMime to the
mimeMultipart.addBodyPart(textMime);
mimeMultipart.addBodyPart(fileMime);
Last sets the content of mimeMultipart as msg
msg.setContent(mimeMultipart); // Sets the mimeMultipart the contents of the msgTransport class finally sent a message.
Transport.send(msg); // Transport class send the message using send() method4.3 Send Email with HTML Format
Often, we need to build HTML content to boost our company's email marketing. This method will send emails with content in HTML format.
public boolean sendHtmlTemplate(String subject, String message, String to)
{
    boolean foo = false; // Set the false, default variable "foo", we will allow it after sending code process email

    String senderEmail = ""; // your gmail email id
    String senderPassword = ""; // your gmail id password

    //Properties class enables us to connect to the host SMTP server
    Properties properties = new Properties();

    // Setting necessary information for object property

    // Setup host and mail server
    properties.put("mail.smtp.starttls.enable", "true"); // enable TLS-protected connection
    properties.put("mail.smtp.host", "smtp.gmail.com"); // Mention the SMTP server address. Here Gmail's SMTP server is being used to send email
    properties.put("mail.smtp.port", "587"); // 587 is TLS port number

    // get the session object and pass username and password
    Session session = Session.getDefaultInstance(properties, new Authenticator()
    {
        protected PasswordAuthentication getPasswordAuthentication(){

            return new PasswordAuthentication(senderEmail, senderPassword);
        }
    });

    try {

        MimeMessage msg = new MimeMessage(session); // Create a default MimeMessage object for compose the message

        MimeMessageHelper helper = new MimeMessageHelper(msg, true); // create MimeMessageHelper class

        helper.setFrom(new InternetAddress(senderEmail)); // adding sender email id to helper object

        msg.addRecipient(Message.RecipientType.TO, new InternetAddress(to)); //adding recipient to msg object

        helper.setSubject(subject); // adding subject to helper object

        MimeMultipart mimeMultipart = new MimeMultipart(); // create MimeMultipart object

        MimeBodyPart textMime = new MimeBodyPart(); // create first MimeBodyPart object textMime for containing the message

        MimeBodyPart messageBodyPart = new MimeBodyPart(); // create second MimeBodyPart object messageBodyPart for containing the html format data

        textMime.setText(message); // sets message to textMime object

        // create message within html format tag and assign to the content variable
        String content = "<br><br><b>Hi friends</b>,<br><i>This email is HTML template style</i>";

        // sets html format content to the messageBodyPart object
        messageBodyPart.setContent(content,"text/html; charset=utf-8");

        //The mimeMultipart adds textMime and messageBodypart to the
        mimeMultipart.addBodyPart(textMime);
        mimeMultipart.addBodyPart(messageBodyPart);

        msg.setContent(mimeMultipart); // Set the mimeMultipart the contents of the msg

        Transport.send(msg); // Transport class send the message using send() method
        System.out.println("Email Sent With HTML Template Style Successfully...");

        foo = true; // Set the "foo" variable to true after successfully sending emails

    }catch(Exception e){

        System.out.println("EmailService File Error"+ e);
    }

    return foo; //and return foo variable
}
Code Explanation:
In this method, all codes from the above method are mostly the same.
We have defined the second element of the constructor's "MimeMessageHelper" class with either a "true" value to show that we want multipart form data to be sent.
The MimeMessageHelperclass for the creation of MIME messages. It provides HTML layout support for images, traditional mail attachments, and text content.
MimeMessageHelper helper = new MimeMessageHelper(msg, true); // create MimeMessageHelper classSet sender email id to object helper.
helper.setFrom(new InternetAddress(senderEmail)); // adding sender email id to helper objectset subject to a helper object
helper.setSubject(subject); // adding subject to helper objectHere, the MimeMultipart object is created to carry multiple parts.
MimeMultipart mimeMultipart = new MimeMultipart(); // create MimeMultipart objectCreates the textMime MimebodyPart object for a message
MimeBodyPart textMime = new MimeBodyPart(); // create first MimeBodyPart object textMime for containing the messageCreate the MimebodyPart messageBodyPart object to contain data in our HTML format
MimeBodyPart messageBodyPart = new MimeBodyPart(); // create second MimeBodyPart object messageBodyPart for containing the html format dataset the message to textMime object
textMime.setText(message); // sets message to textMime objectCreate a few HTML tag texts and assign them to the content variable
// create message within html format tag and assign to the content variable
String content = "<br><br><b>Hi friends</b>,<br><i>This email is HTML template style</i>";
Set the content of the HTML format to the messageBodyPart object
// sets html format content to the messageBodyPart object
messageBodyPart.setContent(content,"text/html; charset=utf-8");
textMime and messageBodypart are added to the mimeMultipart to
//The mimeMultipart adds textMime and messageBodypart to the
mimeMultipart.addBodyPart(textMime);
mimeMultipart.addBodyPart(messageBodyPart);
The mimeMultipart is the last set as msg content or body content
msg.setContent(mimeMultipart); // Set the mimeMultipart the contents of the msgThe Class Transport sent our message
Transport.send(msg); // Transport class send the message using send() method4.4 Send Email with Inline Image
In certain instances, the HTML content in the Java class has to be generated and the inline content is passed to the email.
And another point is, the attachment at the end of the HTML content should also be part of the HTML section.
The following method shows you how to send an email along with an inline image.
public boolean sendEmailInlineImage(String subject, String message, String to)
{
    boolean foo = false; // Set the false, default variable "foo", we will allow it after sending code process email

    String senderEmail = ""; // your gmail email id
    String senderPassword = ""; // your gmail id password

    //Properties class enables us to connect to the host SMTP server
    Properties properties = new Properties();

    // Setting necessary information for object property

    // Setup host and mail server
    properties.put("mail.smtp.auth", "true"); //enable authentication
    properties.put("mail.smtp.starttls.enable", "true"); // enable TLS-protected connection
	properties.put("mail.smtp.host", "smtp.gmail.com"); // Mention the SMTP server address. Here Gmail's SMTP server is being used to send email
    properties.put("mail.smtp.port", "587"); // 587 is TLS port number

    // get the session object and pass username and password
    Session session = Session.getDefaultInstance(properties, new Authenticator()
    {
        protected PasswordAuthentication getPasswordAuthentication(){

            return new PasswordAuthentication(senderEmail, senderPassword);
        }
    });

    try {

        MimeMessage msg = new MimeMessage(session); //compose the message (multi media, text )

        MimeMessageHelper helper = new MimeMessageHelper(msg, true); // create MimeMessageHelper class

        helper.setFrom(new InternetAddress(senderEmail)); //adding sender email id to helper object

        msg.addRecipient(Message.RecipientType.TO, new InternetAddress(to)); //adding recipient to msg object

        helper.setSubject(subject); // adding subject to helper object

        // sets file path location
        String path = "C:\\Users\\Public\\Downloads\\onlyxcodes-logo.png";

        MimeMultipart mimeMultipart = new MimeMultipart(); // create MimeMultipart object

        MimeBodyPart textMime = new MimeBodyPart(); // create first MimeBodyPart object textMime for containing the message

        MimeBodyPart messageBodyPart = new MimeBodyPart(); // create second MimeBodyPart object messageBodyPart for containing the html format message

        MimeBodyPart fileMime = new MimeBodyPart(); // create third MimeBodyPart object fileMime for containing the file

        textMime.setText(message); // sets message to the textMime object

        // create message within html format tag and assign to the content variable
        String content = "<br><b>Hi friends</b>,<br><i>look at this nice logo :)</i>"
            + "<br><img src='cid:image52'/><br><b>Your Regards Onlyxcodes</b>";

        // sets html format content to the messageBodyPart object
        messageBodyPart.setContent(content,"text/html; charset=utf-8");

        File file = new File(path); //Initialize the File and Move Path variable
        fileMime.attachFile(file); //attach file to fileMime object

        helper.addInline("image52", file); //inline image attach using addInline() method

        //The mimeMultipart adds textMime, messageBodypart and fileMime to the
        mimeMultipart.addBodyPart(textMime);
        mimeMultipart.addBodyPart(messageBodyPart);
        mimeMultipart.addBodyPart(fileMime);

        msg.setContent(mimeMultipart); // Set the mimeMultipart the contents of the msg

        Transport.send(msg); // Transport class send the message using send() method
        System.out.println("Email Sent With Inline Image Successfully...");

        foo = true; // Set the "foo" variable to true after successfully sending emails with attchment

    }catch(Exception e){

        System.out.println("EmailService File Error"+ e);
    }

    return foo; //and return foo variable
}
Code Explanation:
Here I explain codes after closing the helper.setSubject(subject); line since the code is the same from the above method above this line.
The location of the image file in the path variable is set.
// sets file path location
String path = "C:\\Users\\Public\\Downloads\\onlyxcodes-logo.png";
Here we build three textMime, messageBodyPart, and fileMime objects from MimeBodyPart.
textMime object containing the message, messageBodyPart containing the information in our HTML format, and fileMime containing the image file
MimeMultipart mimeMultipart = new MimeMultipart(); // create MimeMultipart object

MimeBodyPart textMime = new MimeBodyPart(); // create first MimeBodyPart object textMime for containing the message

MimeBodyPart messageBodyPart = new MimeBodyPart(); // create second MimeBodyPart object messageBodyPart for containing the html format message

MimeBodyPart fileMime = new MimeBodyPart(); // create third MimeBodyPart object fileMime for containing the file
set message to textMime object
textMime.setText(message); // sets message to the textMime objectSee below for a few text formats in HTML tag codes. we need to define the cid attribute for the image tag to which an image is embedded.
// create message within html format tag and assign to the content variable
String content = "<br><b>Hi friends</b>,<br><i>look at this nice logo :)</i>"
    + "<br><img src='cid:image52'/><br><b>Your Regards Onlyxcodes</b>";
Set the HTML content to the messageBodyPart object
// sets html format content to the messageBodyPart object
messageBodyPart.setContent(content,"text/html; charset=utf-8");
Initialize File and move path variable. Attach the file to an object called fileMime.
File file = new File(path); //Initialize the File and Move Path variable
fileMime.attachFile(file); //attach file to fileMime object
Using the addInline() method that comes from the MimeMessageHelper class, we add the inline attachment and pass cid (content-id) and file objects.
Note: Inline resources are added to the mime message using the specified cid (image in the above example). The order in which you are adding the text and the resource are very important. Be sure to first add the text and after that the resources. If you are doing it the other way around, it won't work! (source spring doc )
helper.addInline("image52", file); //inline image attach using addInline() methodtextMime, MessageBodypart, and FileMime objects are attached to the mimeMultipart object.
//The mimeMultipart adds textMime, messageBodypart and fileMime to the
mimeMultipart.addBodyPart(textMime);
mimeMultipart.addBodyPart(messageBodyPart);
mimeMultipart.addBodyPart(fileMime);
The mimeMultipart is last configured as msg content or body content
msg.setContent(mimeMultipart); // Set the mimeMultipart the contents of the msgTransport class sent our message
Transport.send(msg); // Transport class send the message using send() methodCreate Controller Class
5. EmailController.java
This controller class includes four basic Rest API email sending methods.
Using @Autowired annotation we inject the EmailService class object and call every method.
package com.onlyxcodes.sendemail.controller;

import com.onlyxcodes.sendemail.mailservice.EmailService;
import com.onlyxcodes.sendemail.model.EmailRequest;
import org.springframework.beans.factory.annotation.Autowired;
import org.springframework.http.HttpStatus;
import org.springframework.http.ResponseEntity;
import org.springframework.web.bind.annotation.PostMapping;
import org.springframework.web.bind.annotation.RequestBody;
import org.springframework.web.bind.annotation.RestController;

@RestController
public class EmailController {

    @Autowired
    private EmailService emailService;

    //this api send simple email
    @PostMapping("/sendingemail")
    public ResponseEntity<?> sendEmail(@RequestBody EmailRequest request)
    {

        System.out.println(request);


        boolean result = this.emailService.sendEmail(request.getSubject(), request.getMessage(), request.getTo());

        if(result){

            return  ResponseEntity.ok("Email Properly Sent Successfully... ");

        }else{

            return  ResponseEntity.status(HttpStatus.INTERNAL_SERVER_ERROR).body("email sending fail");
        }
    }

    //this api send email with file
    @PostMapping("/sendemailattachement")
    public ResponseEntity<?> sendEmailWithAttachment(@RequestBody EmailRequest request)
    {
        System.out.println(request);

        boolean result = this.emailService.sendWithAttachment(request.getSubject(), request.getMessage(), request.getTo());

        if(result){

            return  ResponseEntity.ok("Sent Email With Attchment Successfully... ");

        }else{

            return  ResponseEntity.status(HttpStatus.INTERNAL_SERVER_ERROR).body("attachment email sending fail");
        }

    }

    //this api send email with html content
    @PostMapping("/sendemailhtml")
    public ResponseEntity<?> sendEmailHtml(@RequestBody EmailRequest request)
    {
        System.out.println(request);


        boolean result = this.emailService.sendHtmlTemplate(request.getSubject(), request.getMessage(), request.getTo());

        if(result){

            return  ResponseEntity.ok("Sent Email With HTML template style Successfully... ");

        }else{

            return  ResponseEntity.status(HttpStatus.INTERNAL_SERVER_ERROR).body("html template style email sending fail");
        }
    }

    //this api send email with inline image
    @PostMapping("/sendemailinlineimage")
    public ResponseEntity<?> sendEmailWithInlineImage(@RequestBody EmailRequest request)
    {
        System.out.println(request);


        boolean result = this.emailService.sendEmailInlineImage(request.getSubject(), request.getMessage(), request.getTo());

        if(result){

            return  ResponseEntity.ok("Sent Email With Inline Image Successfully... ");

        }else{

            return  ResponseEntity.status(HttpStatus.INTERNAL_SERVER_ERROR).body("inline image email sending fail");
        }
    }

}
@RestController is a convenience annotation for Restful Controller development. It is a @Component classification and is autodetected by way of classpath scans. It includes the annotations @Controller and @ResponseBody. The response is translated to JSON or XML.
The @RequestBody annotation is used to bind the HTTP request/response body to the parameter or return type of the model object. HTTP Message Converters use this annotation to translate the HTTP request/response body to model objects.
6. Spring Boot Main Class
This is the main class for bootstrapping our application from Spring Boot. This class can be found and executed inside the com.onlyxcodes.sendemail package.
package com.onlyxcodes.sendemail;

import org.springframework.boot.SpringApplication;
import org.springframework.boot.autoconfigure.SpringBootApplication;

@SpringBootApplication
public class SendEmailApiApplication {

	public static void main(String[] args) { SpringApplication.run(SendEmailApiApplication.class, args);
	}
}
Let’s the test application.
7. Test Application
Let’s check this application all Rest API URL one by one in the postman tool. Friends, the postman tool is also available for downloading now on the Google Chrome extension.
If any testing error is triggered, spring boot inbuild apache tomcat severs displays error messages that can be easily managed on exception.
1. Sending a simple email
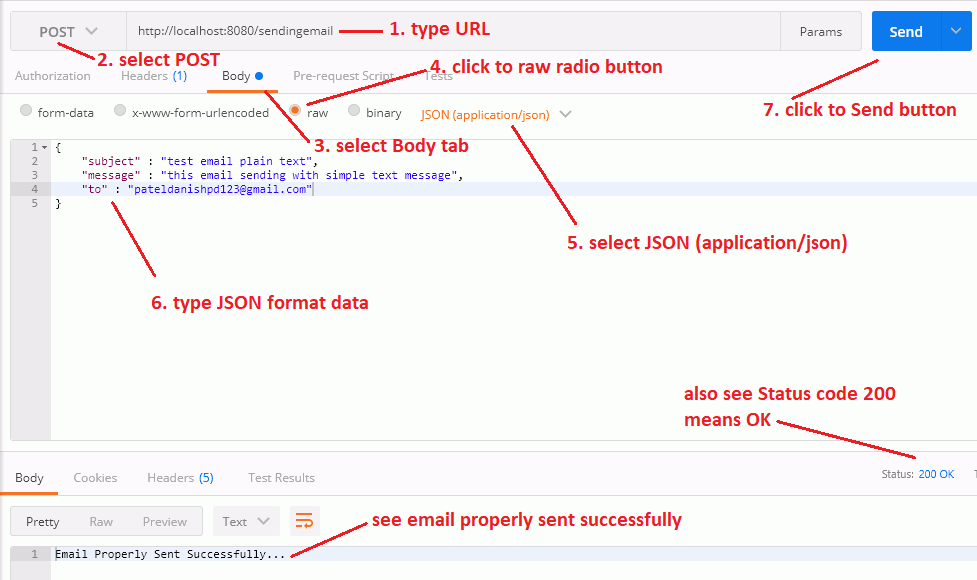
OK, first, to send a simple email using this URL: http://localhost:8080/sendingemail, select the POST method, select the raw radio button on the Body tab, set Content-Type='application/json' on the Headers tab, and paste the JSON code example below.
Note: See JSON code "to": "[email protected]" to enter the right email address for the recipient.
{
	"subject" : "test email plain text",
	"message" : "this email sending with simple text message",
	"to" : "[email protected]"
}
See the recipient in his mailbox receive a simple plain email.

2. Sending an email with Attachment
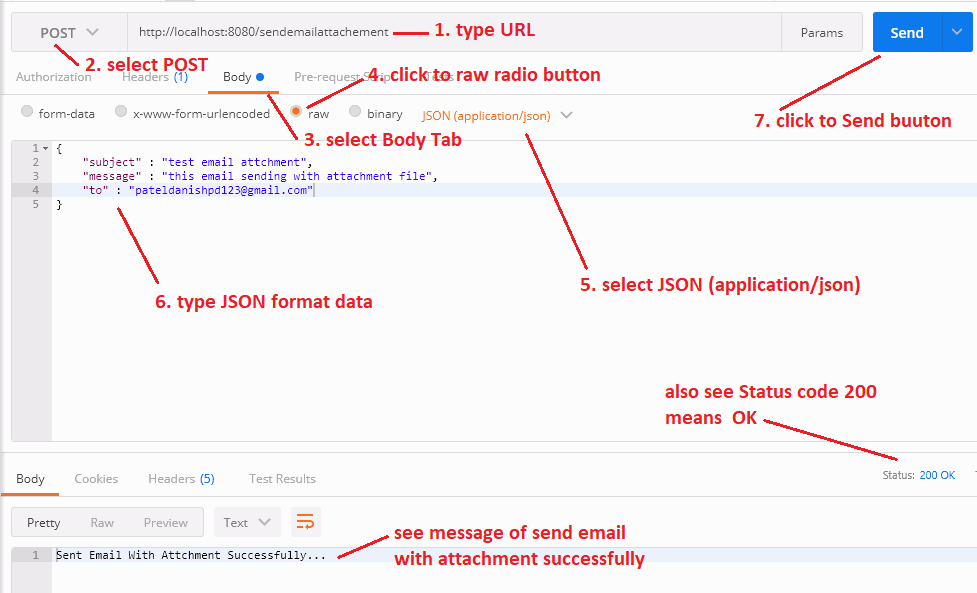
Use the URL http://localhost:8080/sendemailattachment to send an email with an attachment, select the POST method, select the raw radio button in the Body tab, set Content-Type='application/json' in the Headers tab, and paste the following example JSON code.
Note: I attach PDF book files here, but you can also attach other files such as images, docs, etc.
{
	"subject" : "test email attachment",
	"message" : "this email sending with attachment file",
	"to" : "[email protected]"
}
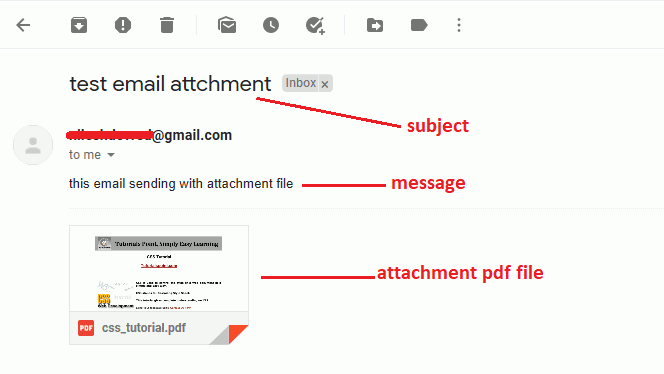
See the receiver receive the email in his mailbox with PDF book and message content.
3. Sending an email in HTML format
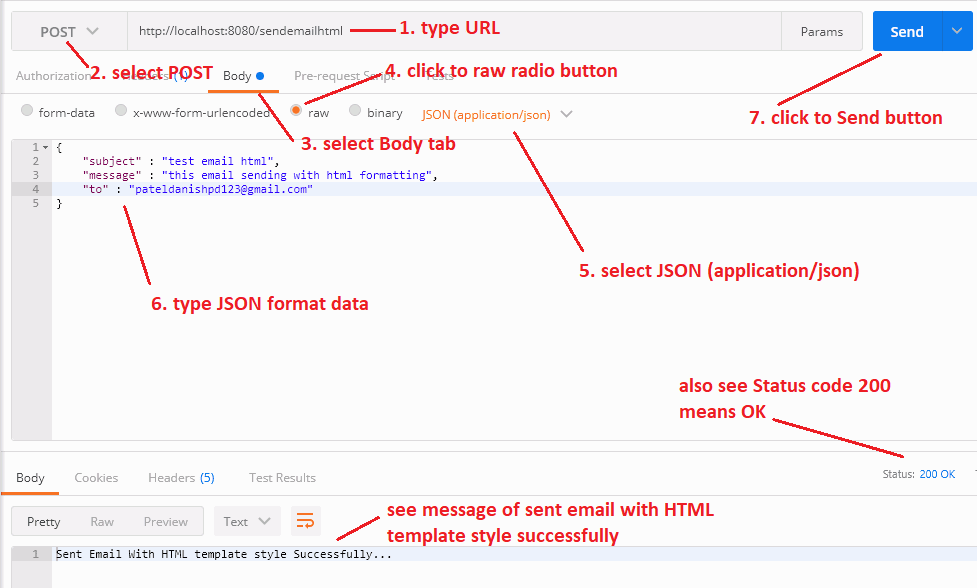
Use the URL http://localhost:8080/sendemailhtml to send the content of our HTML format to your receiver email address. Choose the POST method, select the raw radio button on the Body tab, set Content-Type="application/json" on the Headers tab, and paste the following JSON code illustration.
{
	"subject" : "test email html",
	"message" : "this email sending with html formatting",
	"to" : "[email protected]"
}
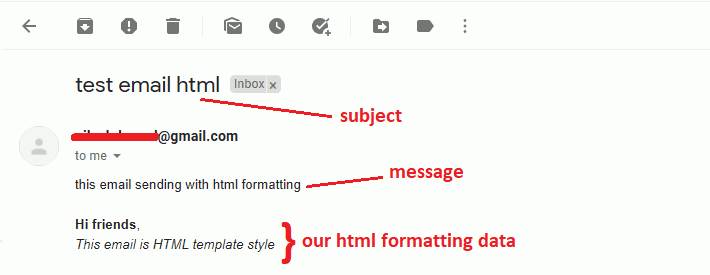
See the recipient receive our email message, including content in HTML format.
4. Sending an email with Inline Image
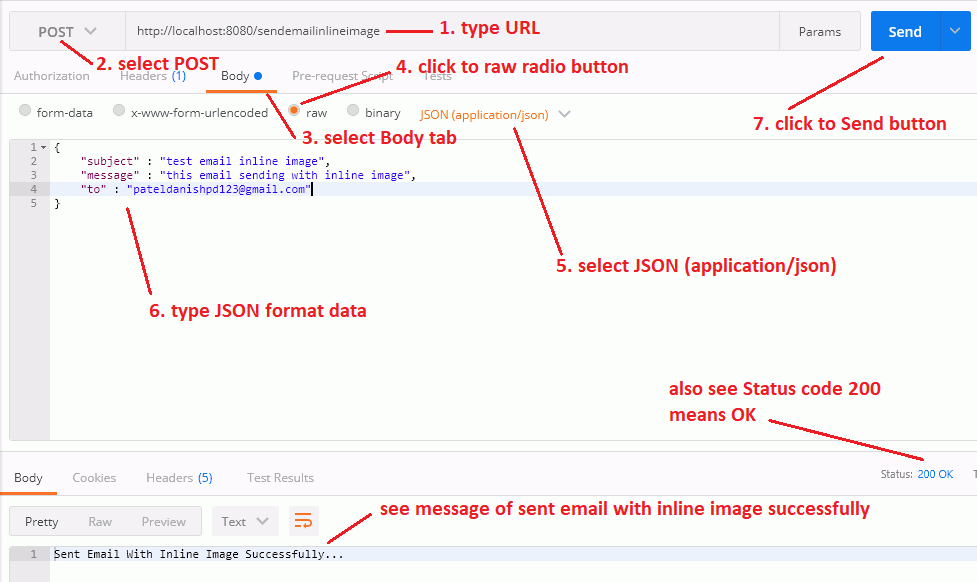
Finally, this http://localhost:8080/sendemailinlineimage Rest API URL included above the functionalities of the process. This URL for sending inline-image emails also includes the content of our subject, message, and HTML format.
select the POST method, select the raw radio button in the Body tab, setting Content-Type=” application/json” in the Headers tab, and pasting the following example JSON code.
{
	"subject" : "test email inline image",
	"message" : "this email sending with inline image",
	"to" : "[email protected]"
}
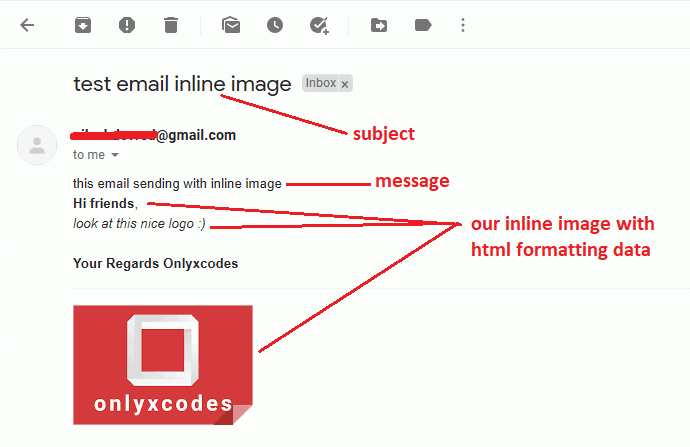
See the receiver receive our mail in his mailbox. See the logo file for the inline image, HTML content, subject, and message.
Wrapping Up
Download Codes


No comments:
Post a Comment