
In this tutorial, we will learn spring boot restful web services crud example with MySQL and JPA. Spring Boot allows you to set up a tiny configuration in a quick way to create your application. That provides the jar files facility to include your custom jar file packages as well as the built-in Tomcat Server for executing your application so we do not have to include external servers.
Let's start the tutorial we do to build the Spring Restful Web Service CRUD application using JPA.

Table Content
1. What is CrudRepository Interface
2. What are RESTful Web Services?
3. CRUD Operations
4. The API we’ll build
5. Database and Table Creating
6. Creating New Spring Boot Project
7. pom.xml
8. application.properties
9. Student.java
10. StudentRepository.java
11. StudentController.java
12. SpringBootRestfulCrudApplication.java
13. Let’s the test application
What is CrudRepository Interface
CrudRepository is an interface that arrives from Spring Framework. CrudRepository extends Spring Data Repository which is a core marker interface for the repository. CrudRepository offers the formulaic method for the operation of creating, reading, updating, and deleting.
CrudRepository contains a total of 11 CRUD operation methods, some of which are listed below which we will be using in this application:
<S extends T> S save(S entity): Save and update a given entity. The entity must not be null and the saved entity; will never be null.
Iterable<T> findAll(): Returns all entities.
Optional<T> findById(ID id): Retrieves an entity by its ID. The ID must not be null.
void deleteById(ID id): Deletes the entity with the given ID. The ID must not be null.
Note: note took above all methods from docs.spring.io
What are RESTful Web Services?
RESTful Web Services are web services that adhere to the principles of Representational State Transfer (REST). These services use HTTP methods (GET, POST, PUT, DELETE) to perform CRUD (Create, Read, Update, Delete) operations on resources, which are typically represented in JSON or XML format.
CRUD Operations
CRUD stands for Create, Read, Update, and Delete. These are the four basic operations for managing data in a database. In the context of a RESTful API:
Create: Adds a new record to the database.
Read: Retrieves one or more records from the database.
Update: Modifies an existing record in the database.
Delete: Removes a record from the database.
The API we'll build
We will create the Student Resource that will use Restful API (URIs) and HTTP requests to consume three services.
| URLs | Method | Description |
|---|---|---|
| /students/add | @PostMapping | Create a new student |
| /students/all | @GettMapping | Retrieve all students |
| /students/student/{id} | @GettMapping | Get records of a particular student |
| /students/update/{id} | @PuttMapping | Update existing student records |
| /students/delete/{id} | @DeleteMapping | Delete a particular student record |
Database and Table Creating
Here I have created the student table and within this table, I have stored two fields first name and last name.
CREATE TABLE `tbl_student` (
  `student_id` int(11) NOT NULL,
  `student_firstname` varchar(15) NOT NULL,
  `student_lastname` varchar(15) NOT NULL
) ENGINE=InnoDB DEFAULT CHARSET=latin1;
Creating New Spring Boot Project
First, we need to create a new Spring Boot project. You can use Spring Initializr (https://start.spring.io/) to generate the project structure but we will create the new project in the STS(Spring Tool Suite)
Note: You must have an enabled internet connection.
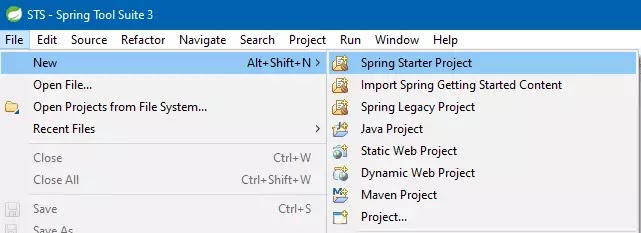
Step 1 – Start Spring Too Suite and go to File -> New -> Spring Starter Project and choose Spring Starter Project according to the figure below.
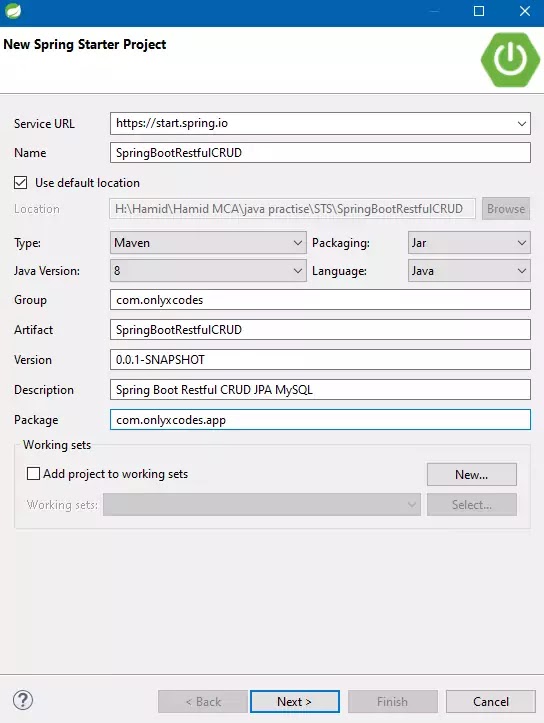
Step 2 – In the second step, we will configure the project.
Name – SpringBootRestfulCRUD
Group – com.onlyxcodes
Description – Spring Boot Restful CRUD JPA and MySQL
Package – com.onlyxcodes.app
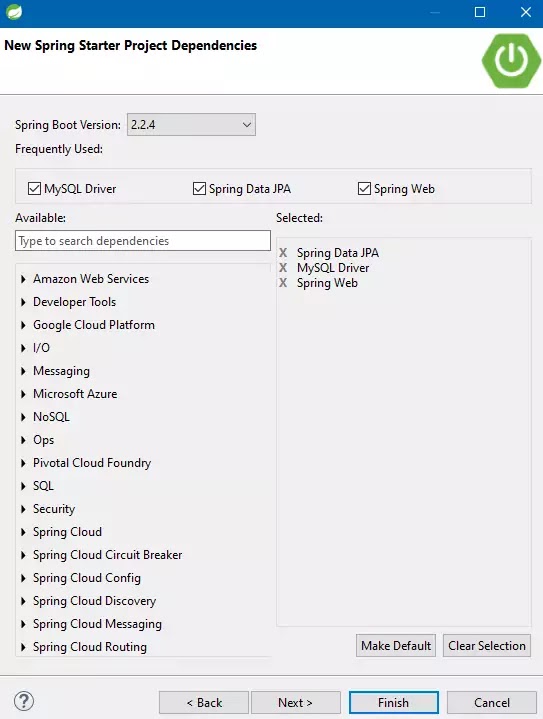
Step 3 – In the third step, we will select packages with custom jar files.
Here we select MySQL Driver, Spring Data JPA, and Spring Web and click on the next button below.
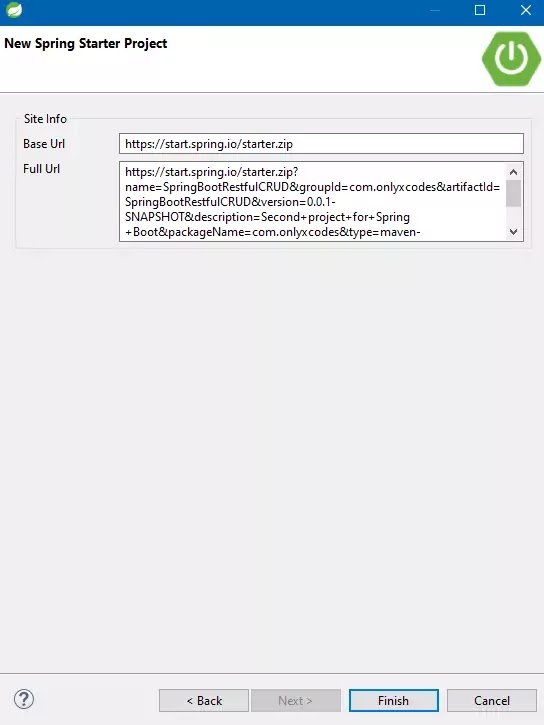
Step 4 – Finally, in the last step, we select the finish button and make our project.
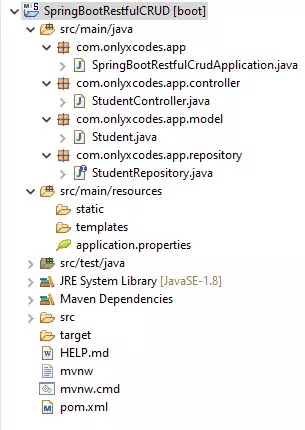
See below our complete project directory structure that we will create step by step.
pom.xml
We will create Spring Boot Restful CRUD applications by following the necessary dependencies.
<?xml version="1.0" encoding="UTF-8"?>
<project xmlns="http://maven.apache.org/POM/4.0.0" xmlns:xsi="http://www.w3.org/2001/XMLSchema-instance"
 xsi:schemaLocation="http://maven.apache.org/POM/4.0.0 https://maven.apache.org/xsd/maven-4.0.0.xsd">
 <modelVersion>4.0.0</modelVersion>
 <parent>
  <groupId>org.springframework.boot</groupId>
  <artifactId>spring-boot-starter-parent</artifactId>
  <version>2.2.4.RELEASE</version>
  <relativePath/> <!-- lookup parent from repository -->
 </parent>
 <groupId>com.onlyxcodes</groupId>
 <artifactId>SpringBootRestfulCRUD</artifactId>
 <version>0.0.1-SNAPSHOT</version>
 <name>SpringBootRestfulCRUD</name>
 <description>Spring Boot Restful CRUD JPA MySQL</description>

 <properties>
    <maven-jar-plugin.version>3.1.1</maven-jar-plugin.version>
 </properties>

 <dependencies>
  <dependency>
   <groupId>org.springframework.boot</groupId>
   <artifactId>spring-boot-starter-data-jpa</artifactId>
  </dependency>
  <dependency>
   <groupId>org.springframework.boot</groupId>
   <artifactId>spring-boot-starter-web</artifactId>
  </dependency>

  <dependency>
   <groupId>mysql</groupId>
   <artifactId>mysql-connector-java</artifactId>
   <scope>runtime</scope>
  </dependency>
  <dependency>
   <groupId>org.springframework.boot</groupId>
   <artifactId>spring-boot-starter-test</artifactId>
   <scope>test</scope>
   <exclusions>
    <exclusion>
     <groupId>org.junit.vintage</groupId>
     <artifactId>junit-vintage-engine</artifactId>
    </exclusion>
   </exclusions>
  </dependency>
 </dependencies>

 <build>
  <plugins>
   <plugin>
    <groupId>org.springframework.boot</groupId>
    <artifactId>spring-boot-maven-plugin</artifactId>
   </plugin>
  </plugins>
 </build>

</project>
application.properties
Next, we need to configure the application properties to connect to the MySQL database. Open the application.properties file located in the src/main/resources directory and add the following configuration:
Replace your database name, username, and password with your actual MySQL database name, username, and password.
# MySQL database connecting utility
spring.datasource.url=jdbc:mysql://localhost:3306/springbootrestcrud_db
spring.datasource.username=root
spring.datasource.password=

# JPA property utility
spring.jpa.hibernate.ddl-auto=update
spring.jpa.properties.hibernate.show_sql=true
Student.java
We will create the entity class that will maps to the tbl_student table in the MySQL database. For this example, let's we create a Student entity. Create a new package named com.onlyxcodes.app.model and add the following class:
package com.onlyxcodes.app.model;

import javax.persistence.Column;
import javax.persistence.Entity;
import javax.persistence.GeneratedValue;
import javax.persistence.GenerationType;
import javax.persistence.Id;
import javax.persistence.Table;

@Entity
@Table(name = "tbl_student")
public class Student {

 @Id
 @GeneratedValue(strategy = GenerationType.AUTO)
 @Column(name = "student_id")
 private int id;

 @Column(name = "student_firstname")
 private String firstname;

 @Column(name = "student_lastname")
 private String lastname;

 public int getId() {
  return id;
 }

 public void setId(int id) {
  this.id = id;
 }

 public String getFirstname() {
  return firstname;
 }

 public void setFirstname(String firstname) {
  this.firstname = firstname;
 }

 public String getLastname() {
  return lastname;
 }

 public void setLastname(String lastname) {
  this.lastname = lastname;
 }

}
Create Repository Interface
StudentRepository.java
Next, we need to create a repository interface to perform CRUD operations.
Here, we create the StudentRepository interface within the com.onlyxcodes.app.repository package and extends CrudRepository which Spring Boot have implemented auto into the Bean called a studentrepository.
After that, we must make the fundamental repository layer that will enables us to carry out CRUD operations on members of the above Student entity class.
We don't need to start from scratch with our own DAO implementation because Spring Data JPA is what we're using. To create a functional repository implementation, we only requires to extend the CrudRepository interface:
In our example, the CrudRespository interface accepts both entity class Student and the ID type Integer.
package com.onlyxcodes.app.repository;

import org.springframework.data.repository.CrudRepository;

import com.onlyxcodes.app.model.Student;

public interface StudentRepository extends CrudRepository<Student, Integer>{

}
Create the Controller
StudentController.java
Finally, inside the package com.onlyxcodes.app.controller we creates StudentController class. This class handles the HTTP requests and perform CRUD (creating, reading, updating, and deleting) operations.
package com.onlyxcodes.app.controller;

import java.util.List;
import java.util.Optional;

import org.springframework.beans.factory.annotation.Autowired;
import org.springframework.web.bind.annotation.DeleteMapping;
import org.springframework.web.bind.annotation.GetMapping;
import org.springframework.web.bind.annotation.PathVariable;
import org.springframework.web.bind.annotation.PostMapping;
import org.springframework.web.bind.annotation.PutMapping;
import org.springframework.web.bind.annotation.RequestBody;
import org.springframework.web.bind.annotation.RequestMapping;
import org.springframework.web.bind.annotation.RestController;

import com.onlyxcodes.app.model.Student;
import com.onlyxcodes.app.repository.StudentRepository;

@RestController
@RequestMapping("students")
public class StudentController {

 @Autowired
 StudentRepository studentrepository;

 // retrieve all student from database
 @GetMapping("all")
 public List<Student> getAllStudent()
 {
  List<Student> student=(List<Student>) studentrepository.findAll();
  return student;
 }

 // insert new student into database
 @PostMapping("add")
 public Student addStudent(@RequestBody Student student)
 {
  return studentrepository.save(student);
 }

 // get particular student by their ID
 @GetMapping("student/{id}")
 public Optional<Student> getStudentId(@PathVariable int id)
 {
  return studentrepository.findById(id);
 }

 // update existing student
 @PutMapping("update/{id}")
 public Student updateStudent(@RequestBody Student student)
 {
  return studentrepository.save(student);
 }

 // delete particular student from database
 @DeleteMapping("delete/{id}")
 public void deleteStudent(@PathVariable int id)
 {
  studentrepository.deleteById(id);
 }
}
@RequestMapping("/students") specifies that in this controller the URL of the REST API must begin with /students, so that we can use http://localhost:8080/students as our endpoint.
We use @Autowired for StudentRepository Interface class object injection.
The annotation @RequestBody indicates that a method parameter will be attached to the body of the web request. That means the method expects the following information in JSON format from the submission.
In spring the @PathVariable annotation binds the URI template variables to a controller's handler method parameters. A URI template contains the following variables of one or more paths enclosed by braces ({ }).
Note: the name of the template variable (between the curly braces) and the name of the parameter should match up.
The @RestController annotation contains the @Controller and @ResponseBody annotations. The @Controller annotation represents a class with endpoints and the @ResponseBody indicates a method return value should be bound to the web response body (according to documentation).
The annotation @GetMapping denotes that a GET request is processed by the method.
An annotation called @PostMapping indicates that a function handles a POST request.
The annotation @PutMapping shows that a function handles a PUT request.
The annotation @DeleteMapping indicates that a method handles a DELETE request.
SpringBootRestfulCrudApplication.java
Our application will execute by App Class.
package com.onlyxcodes.app;

import org.springframework.boot.SpringApplication;
import org.springframework.boot.autoconfigure.SpringBootApplication;

@SpringBootApplication
public class SpringBootRestfulCrudApplication {

 public static void main(String[] args) {
  SpringApplication.run(SpringBootRestfulCrudApplication.class, args);
 }

}
Let's the test application
This application will start on the default port 8080. You can test the CRUD operations using tools like Postman or cURL by sending HTTP requests to the endpoints defined in the StudentController class.
Now we put all of the codes perfectly. Let's we have check this application in the Postman. This tool is also available on the Google Chrome extension.
1. Create a new Student.
First, we add the new student to this URL http://localhost:8080/students/ add, select the POST method, select the raw radio button in the Body tab, set Content-Type="application/json" in the Headers tab, and paste the following JSON code.
Note: If you want to insert a new record, we don't need to type the Id number because Hibernate automatically generates the sequence number in the database.
{
    "firstname": "hamid",
    "lastname": "shaikh"
}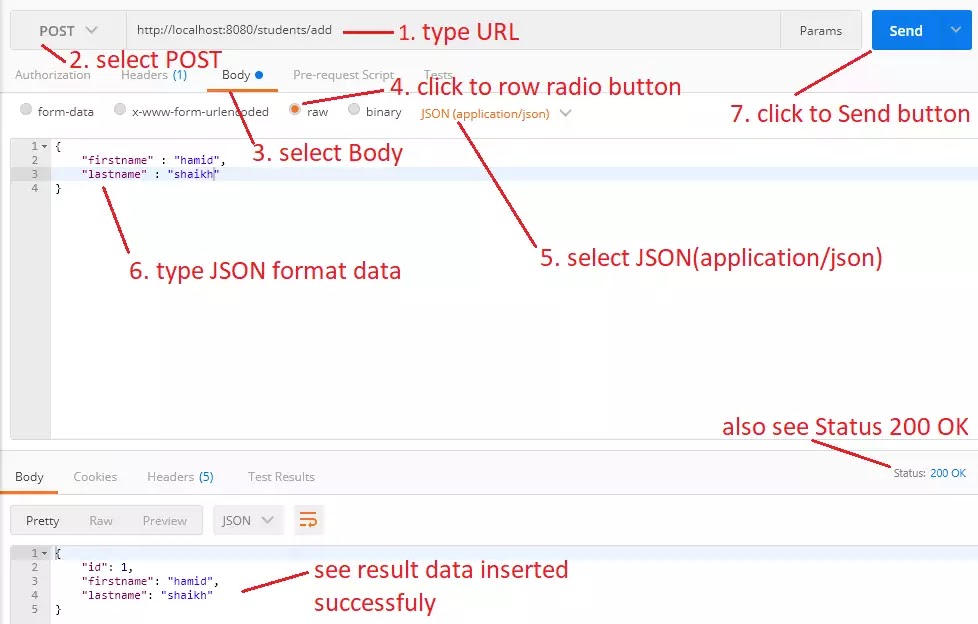
Look also records created in the tbl_student table.

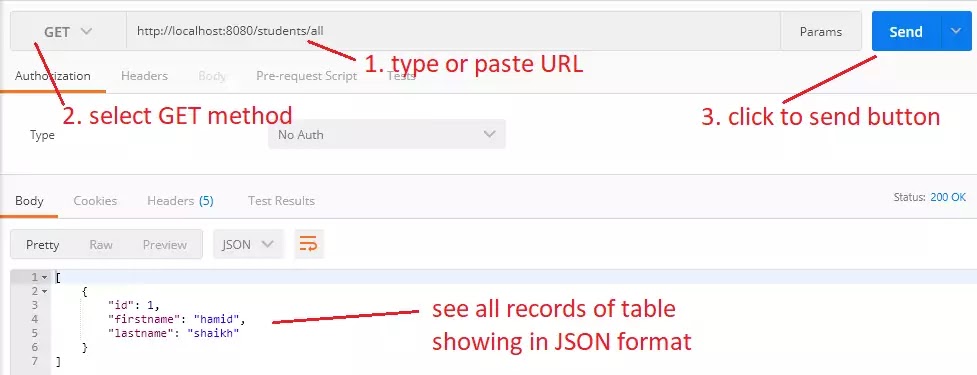
2. Read student record
Using this URL http://localhost:8080/students/all we retrieve student records. Here we choose the GET method and click the Send button.
3. Update student record
We update the existing student record using this URL http://localhost:8080/students/update/1, we select the PUT method, we select the raw radio button in the Body tab, we set Content-Type="application/json" in the Headers tab, and then we paste the following JSON code.
Note: URL end 1 is our table ID because we changed the record of 1 ID number.
{
    "id": 1,
    "firstname": "ankit",
    "lastname": "patel"
}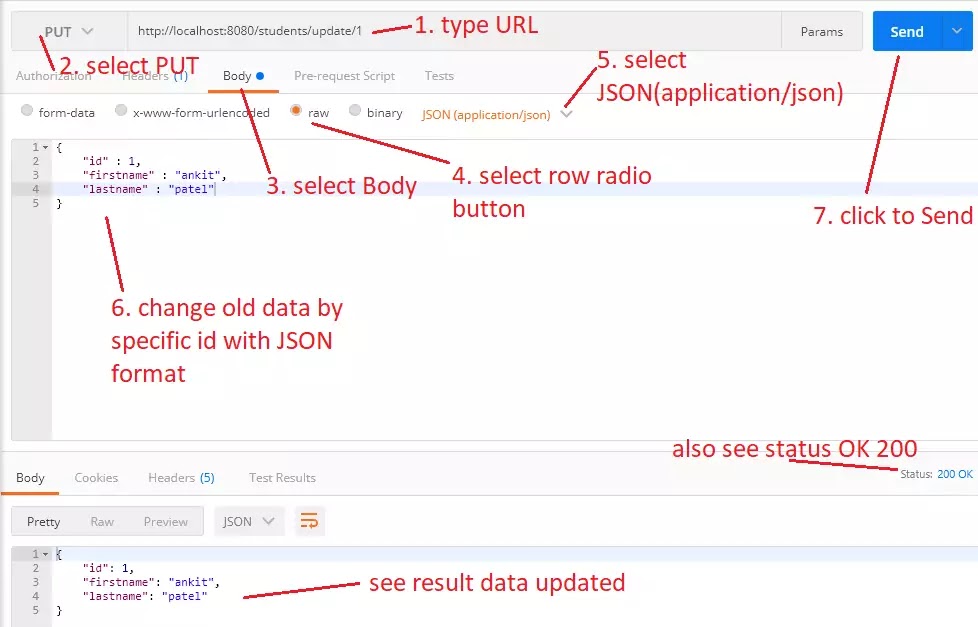
Look for records updated on the ID 1 number in the tbl_student table.

4. Delete student record
Finally, with this URL http://localhost:8080/students/delete/1 we delete the student record. Here we select the DELETE method and click on the send button.
Note: At the end of the URL, the 1 number is our table ID because we want to delete the record of the 1 ID number.
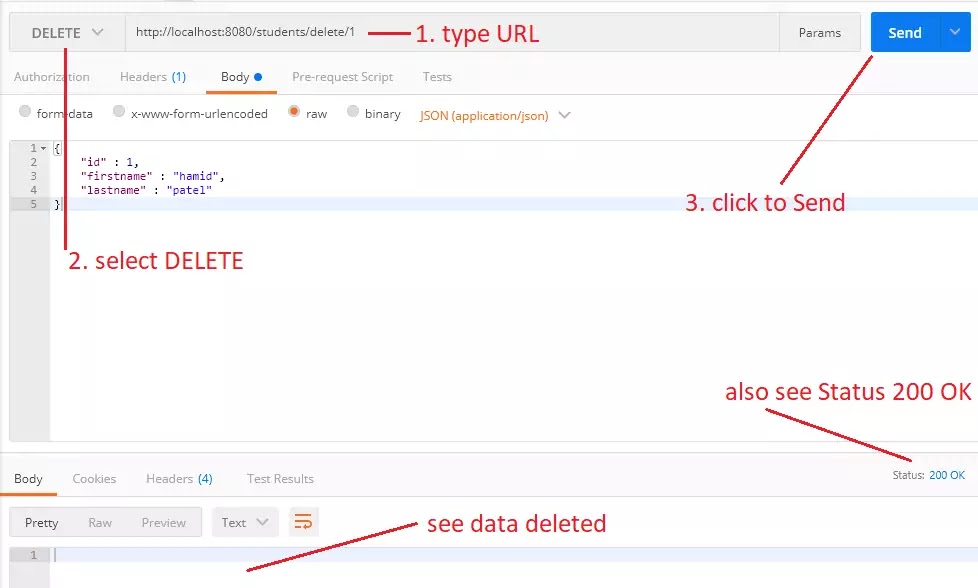
Look also at the records deleted on the tbl_student table

I hope you are enjoying Spring Boot Restful Web Service CRUD example Happy Coding :)
Download Codes


No comments:
Post a Comment